Series: Edge AI Yocto Integration
- Part 1: AMD PetaLinux 2025.2 (this post)
In the Edge AI Power Benchmarking series, we installed the vendor driver, runtime, and APIs on Ubuntu Linux, which is typical for research and prototyping:
When we move into production, however, it is more typical to encounter Yocto, the de-facto Linux distribution build system for production embedded systems.
As I integrate edge AI accelerators into real-world embedded designs, the practical question becomes:
Does this vendor publish Yocto recipes, and do they target the release my project is already on?
This is Part 1 of a series on integrating M.2 edge AI accelerators into Yocto-based projects.
It is a snapshot for one specific Yocto release (scarthgap, the current LTS) on one specific embedded platform (AMD Zynq-UltraScale+ / PetaLinux 2025.2). I will cover which of the M.2 edge AI accelerators are supported by this embedded platform.
I hope to cover Yocto integrations for other embedded platforms and/or Yocto versions in the future.
Embedded Platform Details
The embedded platform we will be targeting is:
- SoC: AMD/Xilinx Zynq UltraScale+ MPSoC
- Dev boards: Tria UltraZed-EV SOM and Carrier Card, AMD ZCU104, AMD ZCU106
- AMD tooling: Vitis / Vivado / PetaLinux 2025.2
- Yocto release: scarthgap (5.0 LTS, April 2024)
For this exercise, I have chosen to use a reference design provided by Opsero:
Jeff Johnson at Opsero does an excellent job of documenting and updating his reference designs.
This reference design supports the following Zynq-UltraScale+ embedded platforms:
- Tria UltraZed-EV SOM and Carrier Card (dual M.2 slots, PCIe Gen 3, x4 lanes)
- AMD ZCU104 (single M.2 slots, PCIe Gen 3, x1 lane)
- AMD ZCU106 (dual M.2 slots, PCIe Gen 3, x4 lanes)
As the project name suggests, the Yocto integration for Hailo-8 has already been done, so we have a path of least resistance. It also has multiple MIPI cameras already integrated, which is a bonus!
Let’s Go!
Yocto Release Timeline
The following table contains the Yocto release timeline (LTS releases highlighted in bold):
| Date | Yocto release | Yocto version |
|---|---|---|
| 2019-10 | zeus | 3.0 |
| 2020-04 | dunfell | 3.1 LTS |
| 2020-10 | gatesgarth | 3.2 |
| 2021-04 | hardknott | 3.3 |
| 2021-10 | honister | 3.4 |
| 2022-04 | kirkstone | 4.0 LTS |
| 2022-10 | langdale | 4.1 |
| 2023-04 | mickledore | 4.2 |
| 2023-10 | nanbield | 4.3 |
| 2024-04 | scarthgap | 5.0 LTS |
| 2024-10 | styhead | 5.1 |
| 2025-04 | walnascar | 5.2 |
Yocto releases are on a strict twice-yearly cadence (April and October), with every fourth release designated as Long-Term Support (LTS). One LTS every two years: dunfell, kirkstone, and scarthgap being the three most recent.
PetaLinux Yocto Pairing
For each PetaLinux release, AMD pins exactly one Yocto release via LAYERSERIES_COMPAT in meta-xilinx. The mapping below is derived from the rel-v<X>.<Y> branches of https://github.com/Xilinx/meta-xilinx:
| PetaLinux release | Yocto release | Yocto version |
|---|---|---|
| 2020.1 | zeus | 3.0 |
| 2020.2 | zeus | 3.0 |
| 2021.1 | gatesgarth | 3.2 |
| 2021.2 | gatesgarth | 3.2 |
| 2022.1 | honister | 3.4 |
| 2022.2 | honister | 3.4 |
| 2023.1 | langdale | 4.1 |
| 2023.2 | langdale | 4.1 |
| 2024.1 | langdale | 4.1 |
| 2024.2 | scarthgap | 5.0 LTS |
| 2025.1 | scarthgap | 5.0 LTS |
| 2025.2 | scarthgap | 5.0 LTS |
| 2026.1 | scarthgap | 5.0 LTS |
What is unusual is that AMD has skipped every Yocto LTS release prior to scarthgap. Fortunately, the latest versions are pinned to version 5.0 LTS.
Yocto Vendor Support (meta-<vendor>)
To answer my first question:
Does this vendor publish Yocto recipes?
The answer is yes. Each of the four vendors publishes a public meta-<vendor> layer on GitHub:
- Hailo :
hailo-ai/meta-hailo - Axelera :
axelera-ai-hub/meta-axelera - DeepX :
DEEPX-AI/meta-deepx-m1 - MemryX :
memryx/memx-yocto
The table below overlays each vendor’s support onto the Yocto release timeline (LTS releases highlighted in bold):
| Date | Yocto release | Yocto version | Hailo | Axelera | DeepX | MemryX |
|---|---|---|---|---|---|---|
| 2019-10 | zeus | 3.0 | ✓ | |||
| 2020-04 | dunfell | 3.1 LTS | ✓ | ✓ | ||
| 2020-10 | gatesgarth | 3.2 | ✓ | |||
| 2021-04 | hardknott | 3.3 | ✓ | |||
| 2021-10 | honister | 3.4 | ✓ | |||
| 2022-04 | kirkstone | 4.0 LTS | ✓ | ✓ | ||
| 2022-10 | langdale | 4.1 | ||||
| 2023-04 | mickledore | 4.2 | ✓ | ✓ | ||
| 2023-10 | nanbield | 4.3 | ||||
| 2024-04 | scarthgap | 5.0 LTS | ✓ | ✓ | ✓ | |
| 2024-10 | styhead | 5.1 | ✓ | |||
| 2025-04 | walnascar | 5.2 | ✓ |
For this article, I will start with the vendors that have explicit support for Yocto 5.0 (scarthgap):
- Hailo-8
- Axelera Metis
- DeepX M1
In my previous articles, I have integrated Hailo-8 into two other Yocto versions:
- Supercharge your ZUBoard with the Hailo-8 AI Accelerator - Yocto 3.4 (honister)
- Adding Support for Hailo-8 - Yocto 4.1 (langdale)
In the first article, the integration was for Yocto 3.4 (honister), which was supported by Hailo, and went smoothly.
In the second article, the integration was for Yocto 4.1 (langdale), which was not supported by Hailo. Although not as smooth, the integration was possible.
I may tackle adapting their meta layer to an unsupported Yocto version, as I did previously with Hailo, since this is what you may inevitably run into.
Before diving into the integration, we need to modify our embedded platform.
Modifying the Reference Design
When integrating other vendors into this reference design, I ran into two major issues:
- insufficient BAR regions (required for Axelera, DeepX, and MemryX)
- insufficient PERST# assertion (required for DeepX, and MemryX)
Adding support for more BAR regions
The following table summarizes the BAR regions that each M.2 accelerator requires:
| Module | BAR0 | BAR2 | BAR3 | BAR4 | ROM/other |
|---|---|---|---|---|---|
| Hailo-8 | 16 KB pref-64 | 4 KB pref-64 | — | 16 KB pref-64 | — |
| Axelera Metis | 4 KB non-pref-64 | 32 MB non-pref-32 | — | — | 64 KB pref (exp ROM) |
| DeepX M1 | 8 MB pref-64 | 1 MB non-pref-32 | 64 KB non-pref-32 | 4 KB non-pref-32 | BAR5 64 KB non-pref-32 |
| MemryX MX3 | 4 KB non-pref-64 | ~16 MB non-pref-32 | — | — | — |
The Hailo-8 only requires prefetch memory, whereas the Axelera Metis, DeepX M1, and MemryX MX3 all require non-prefetch memory, which must be kept below 4GB addressing.
The current design has one BAR region (prefetch memory) available per PCIe root port, and therefore only supports Hailo-8:
| PCIe core | Root bus | AXI BAR window | Address range | Size | Type |
|---|---|---|---|---|---|
| XDMA #0 | 0000:00 | window 0 (only) | 0x5_4000_0000 – 0x5_4FFF_FFFF | 256 MB | pref, 64-bit |
| XDMA #1 | 0001:00 | window 0 (only) | 0x5_5000_0000 – 0x5_5FFF_FFFF | 256 MB | pref, 64-bit |
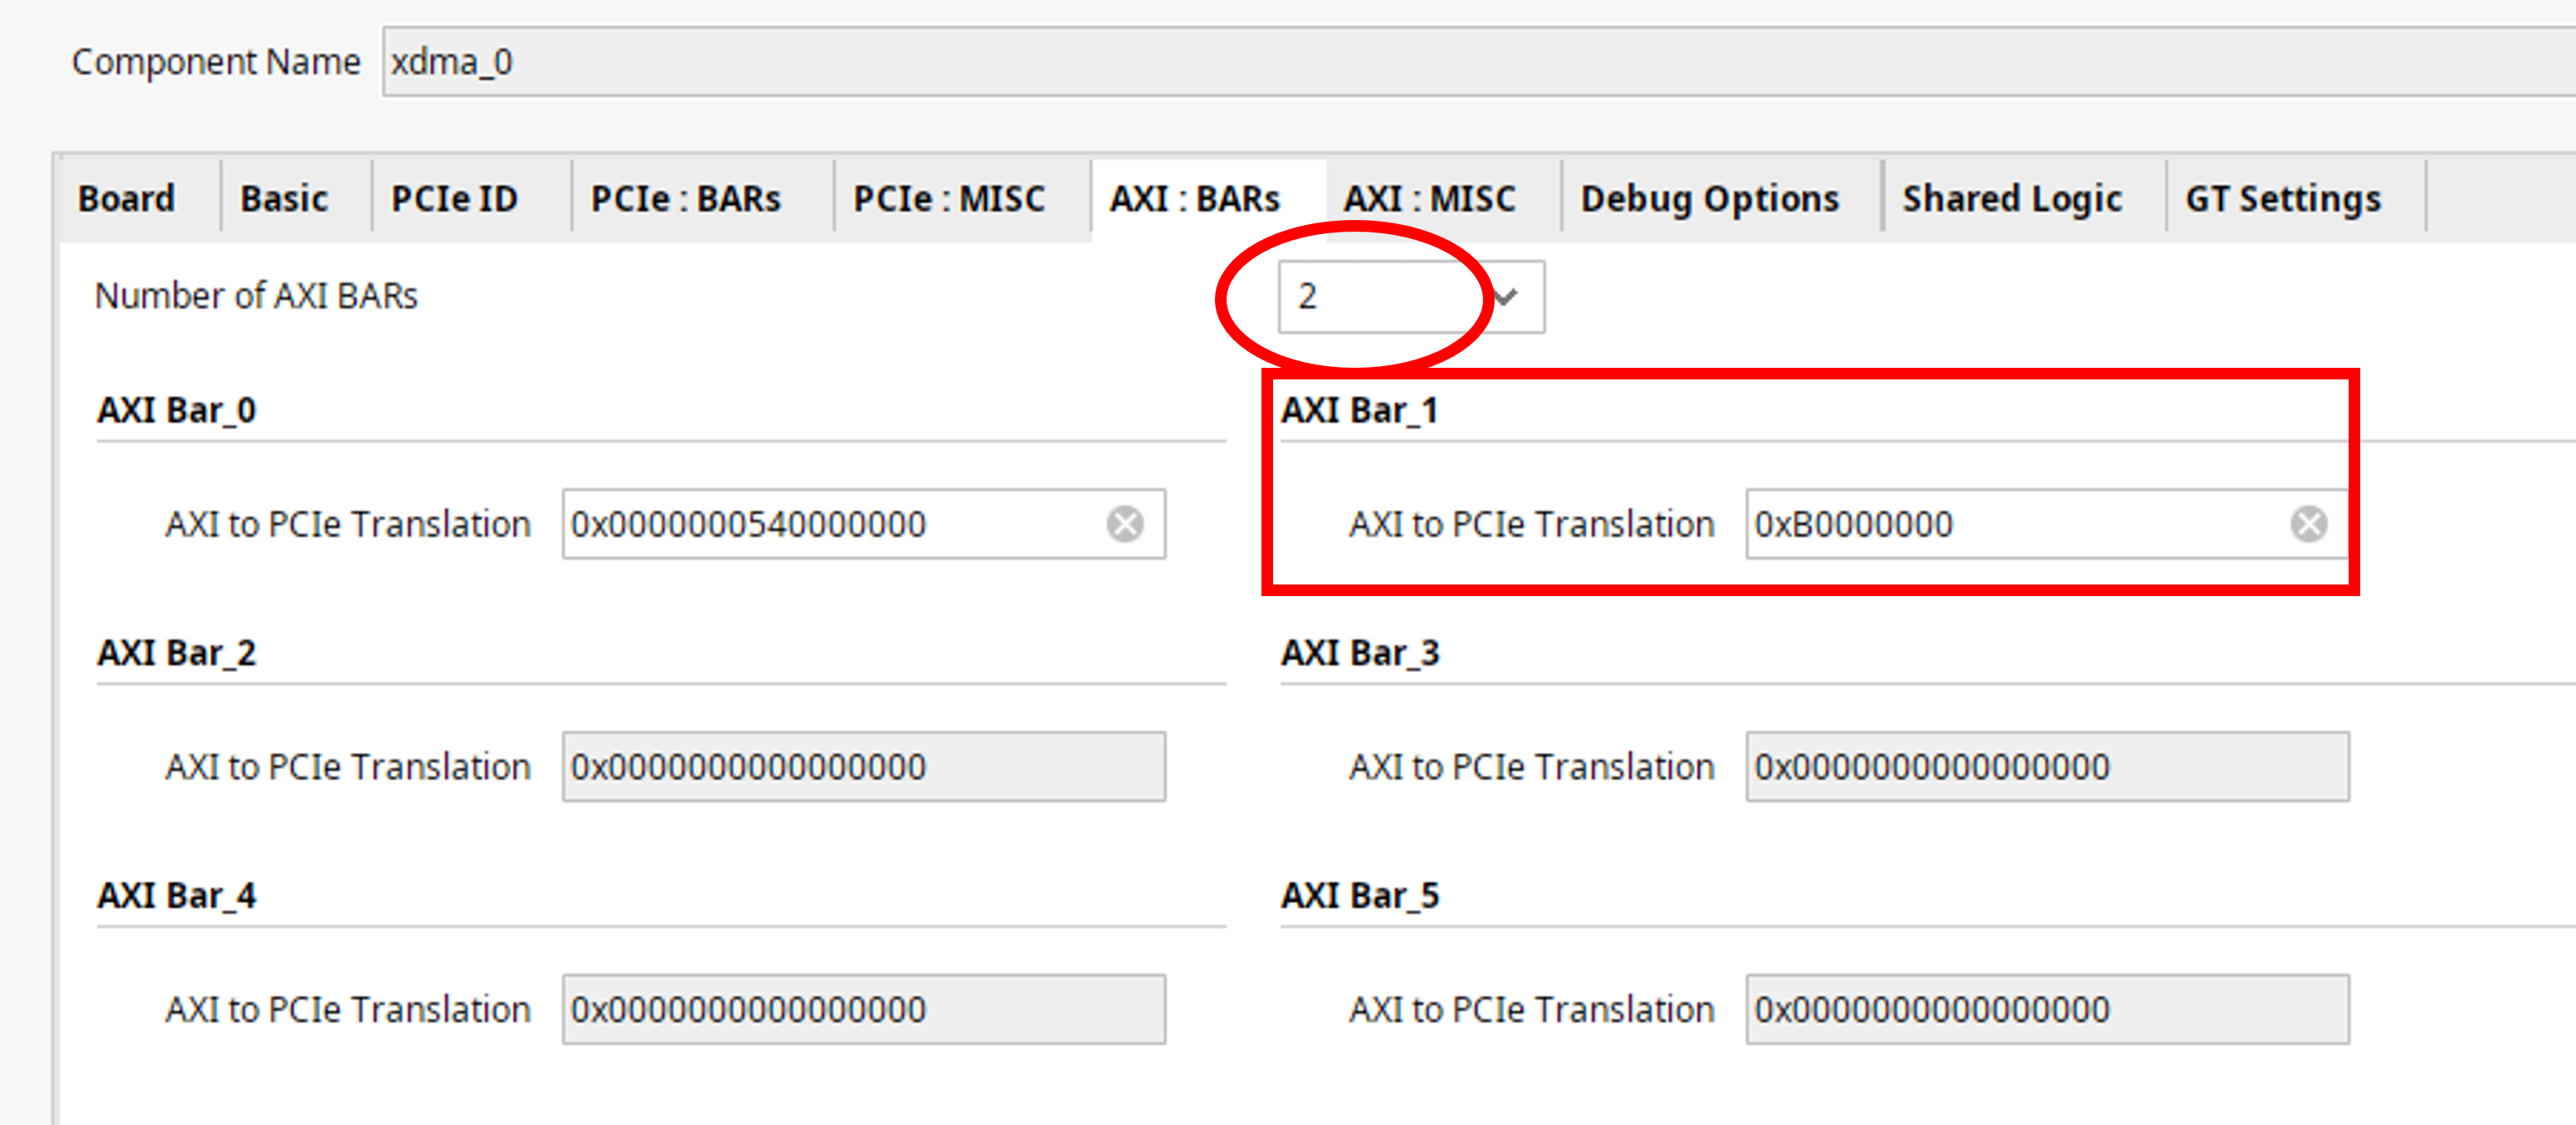
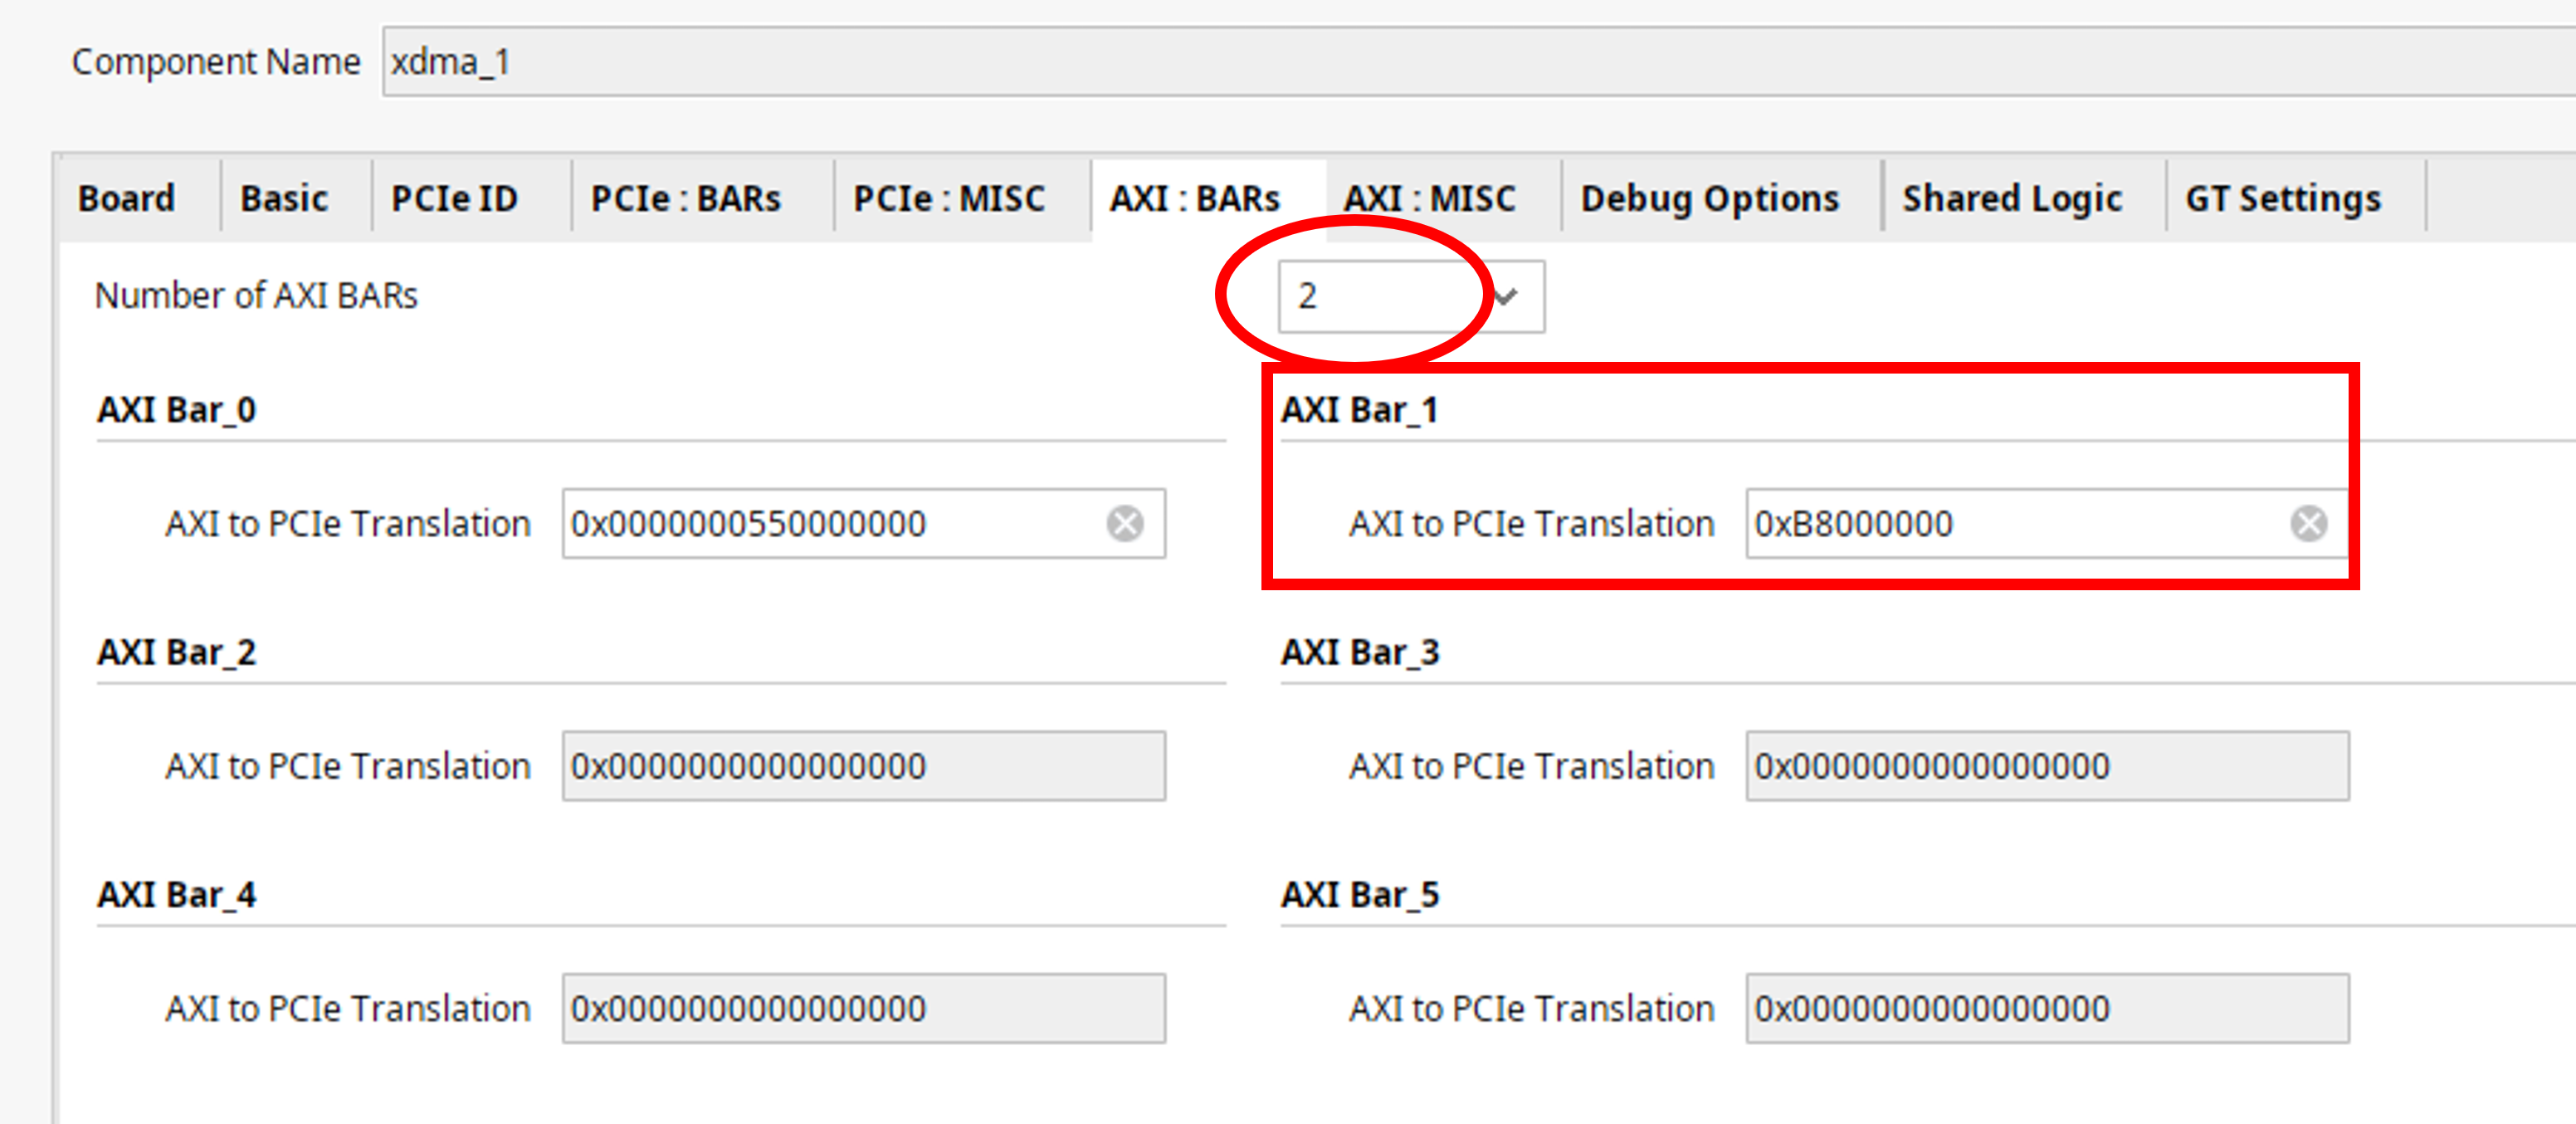
In order to support the other vendors, we need to configure the AXI XDMA cores, to include a second BAR for the non-prefetch memory:
| PCIe core | Root bus | AXI BAR window | Address range | Size | DT flag | Type | Change |
|---|---|---|---|---|---|---|---|
| XDMA #0 | 0000:00 | window 0 | 0xB000_0000 – 0xB7FF_FFFF | 128 MB | 0x02000000 | non-pref, 32-bit | new |
| window 1 | 0x5_4000_0000 – 0x5_4FFF_FFFF | 256 MB | 0x43000000 | pref, 64-bit | existing | ||
| XDMA #1 | 0001:00 | window 0 | 0xB800_0000 – 0xBFFF_FFFF | 128 MB | 0x02000000 | non-pref, 32-bit | new |
| window 1 | 0x5_5000_0000 – 0x5_5FFF_FFFF | 256 MB | 0x43000000 | pref, 64-bit | existing |
This is done in Vivado for each of the AXI XDMA cores:
These new BAR regions need to be assigned in the Address Editor:

The type of BAR (“prefetch” versus “non-prefetch”) cannot be configured in the AXI XDMA cores. Instead this is specified in the device tree, where the following snippet was added to project-spec/meta-user/recipes-bsp/device-tree/files/system-user.dtsi:
/* PCIe BAR fix */

// pci_bus 0000:00: root bus resource [mem 0xb0000000-0xb7ffffff pref]   ← should NOT say "pref"
// pci_bus 0000:00: root bus resource [mem 0x540000000-0x54fffffff pref]
&{/pl-bus/axi-pcie@b0000000} {
    ranges = <0x02000000 0x00 0xb0000000 0x00 0xb0000000 0x00 0x08000000   /* NON-pref 32-bit, 128 MB */
              0x43000000 0x05 0x40000000 0x05 0x40000000 0x00 0x10000000>; /* pref 64-bit, 256 MB  existing */
};
// pci_bus 0001:00: root bus resource [mem 0xb8000000-0xbfffffff pref]   ← should NOT say "pref"
// pci_bus 0001:00: root bus resource [mem 0x550000000-0x55fffffff pref]
&{/pl-bus/axi-pcie@b8000000} {
    ranges = <0x02000000 0x00 0xb8000000 0x00 0xb8000000 0x00 0x08000000   /* NON-pref 32-bit, 128 MB */
              0x43000000 0x05 0x50000000 0x05 0x50000000 0x00 0x10000000>; /* pref 64-bit, 256 MB existing */
};
With these changes, the embedded platform now supports the BAR requirements of all four vendors.
Adding Support for Asserting PERST#
When I first tested the detection of the DeepX M1 module with lspci, it was simply “not there”. It took me a while to figure out what was causing this.
I would like to mention here that the AI coding tools were of no use for this issue. The recommendations I received (insufficient power?, incompatible software versions?, etc.) mostly wasted my time. It was only when I decided to use DeepX’s on-line chat bot deepx.rapidflare.ai, that I got a significant clue:
PERST# Requirements for DEEPX M1

1. Timing and Sequencing
- The PERST# signal should be asserted (held low) during system power-up and remain asserted until all power rails supplied to the M1 are stable and within specification.
- Only after the power rails are stable should PERST# be deasserted (released high), allowing the M1 to begin its initialization and enumeration on the PCIe bus.

2. Minimum Assertion Time
- PERST# should be held low for a minimum duration as specified by the PCIe standard (typically at least 100 ms after power rails are stable), to guarantee proper internal reset of the device.

3. Host Control
- The host platform (e.g., embedded board or PC) is responsible for generating and controlling the PERST# signal to the M1.
- If the host does not assert PERST# correctly, the M1 may not initialize properly, leading to enumeration failures or device instability.

4. Use Cases
- Power-on Reset: During initial system boot, PERST# ensures the M1 starts cleanly.
- Warm/Cold Reset: The host can assert PERST# to reinitialize the M1 without a full power cycle, useful for error recovery or after firmware updates.

Practical Recommendations
- Board Design: Ensure your embedded platform routes the PERST# signal from the host controller to the M1’s PCIe connector (M.2 or other form factor).
- Firmware/BIOS: Confirm that your system firmware or BIOS manages PERST# according to PCIe best practices.
- Debugging: If the M1 is not detected, check with an oscilloscope or logic analyzer that PERST# is asserted and deasserted at the correct times relative to power rails.
The Opsero reference design does not assert PERST# to the M.2 slots. In fact, this is not necessary for NVME SSDs. I confirmed that it was not even required for Hailo-8 or Axelera Metis. For DeepX M1 and MemryX MX3, however, it was required.
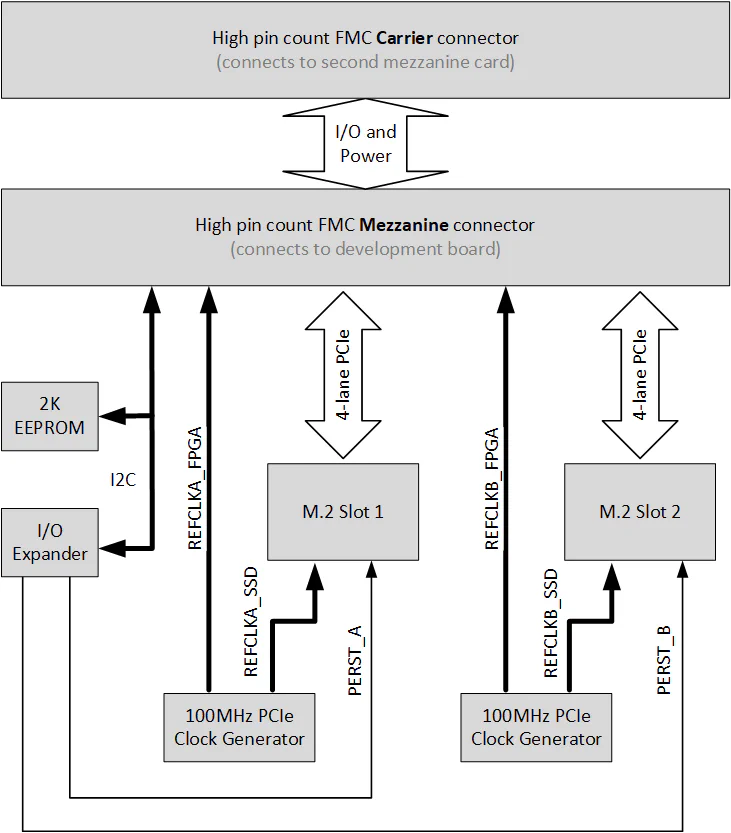
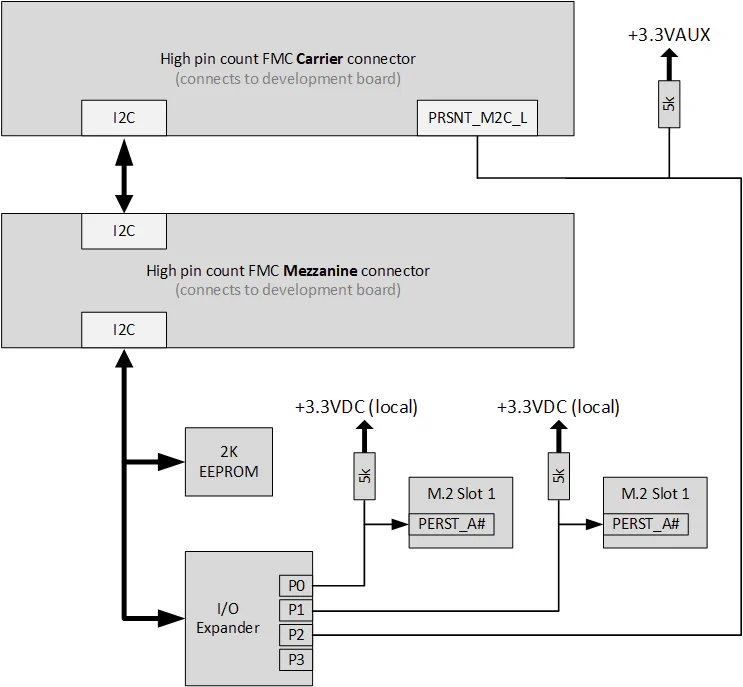
The M.2 Stack FMC has these PERST_A# and PERST_B# signals implemented with an I2C I/O expander.
This first diagram illustrates how the M.2 slots are connected on the M.2 Stack FMC (image from Opsero):
This second diagram illustrates the details of the I2C I/O expander (image from Opsero):
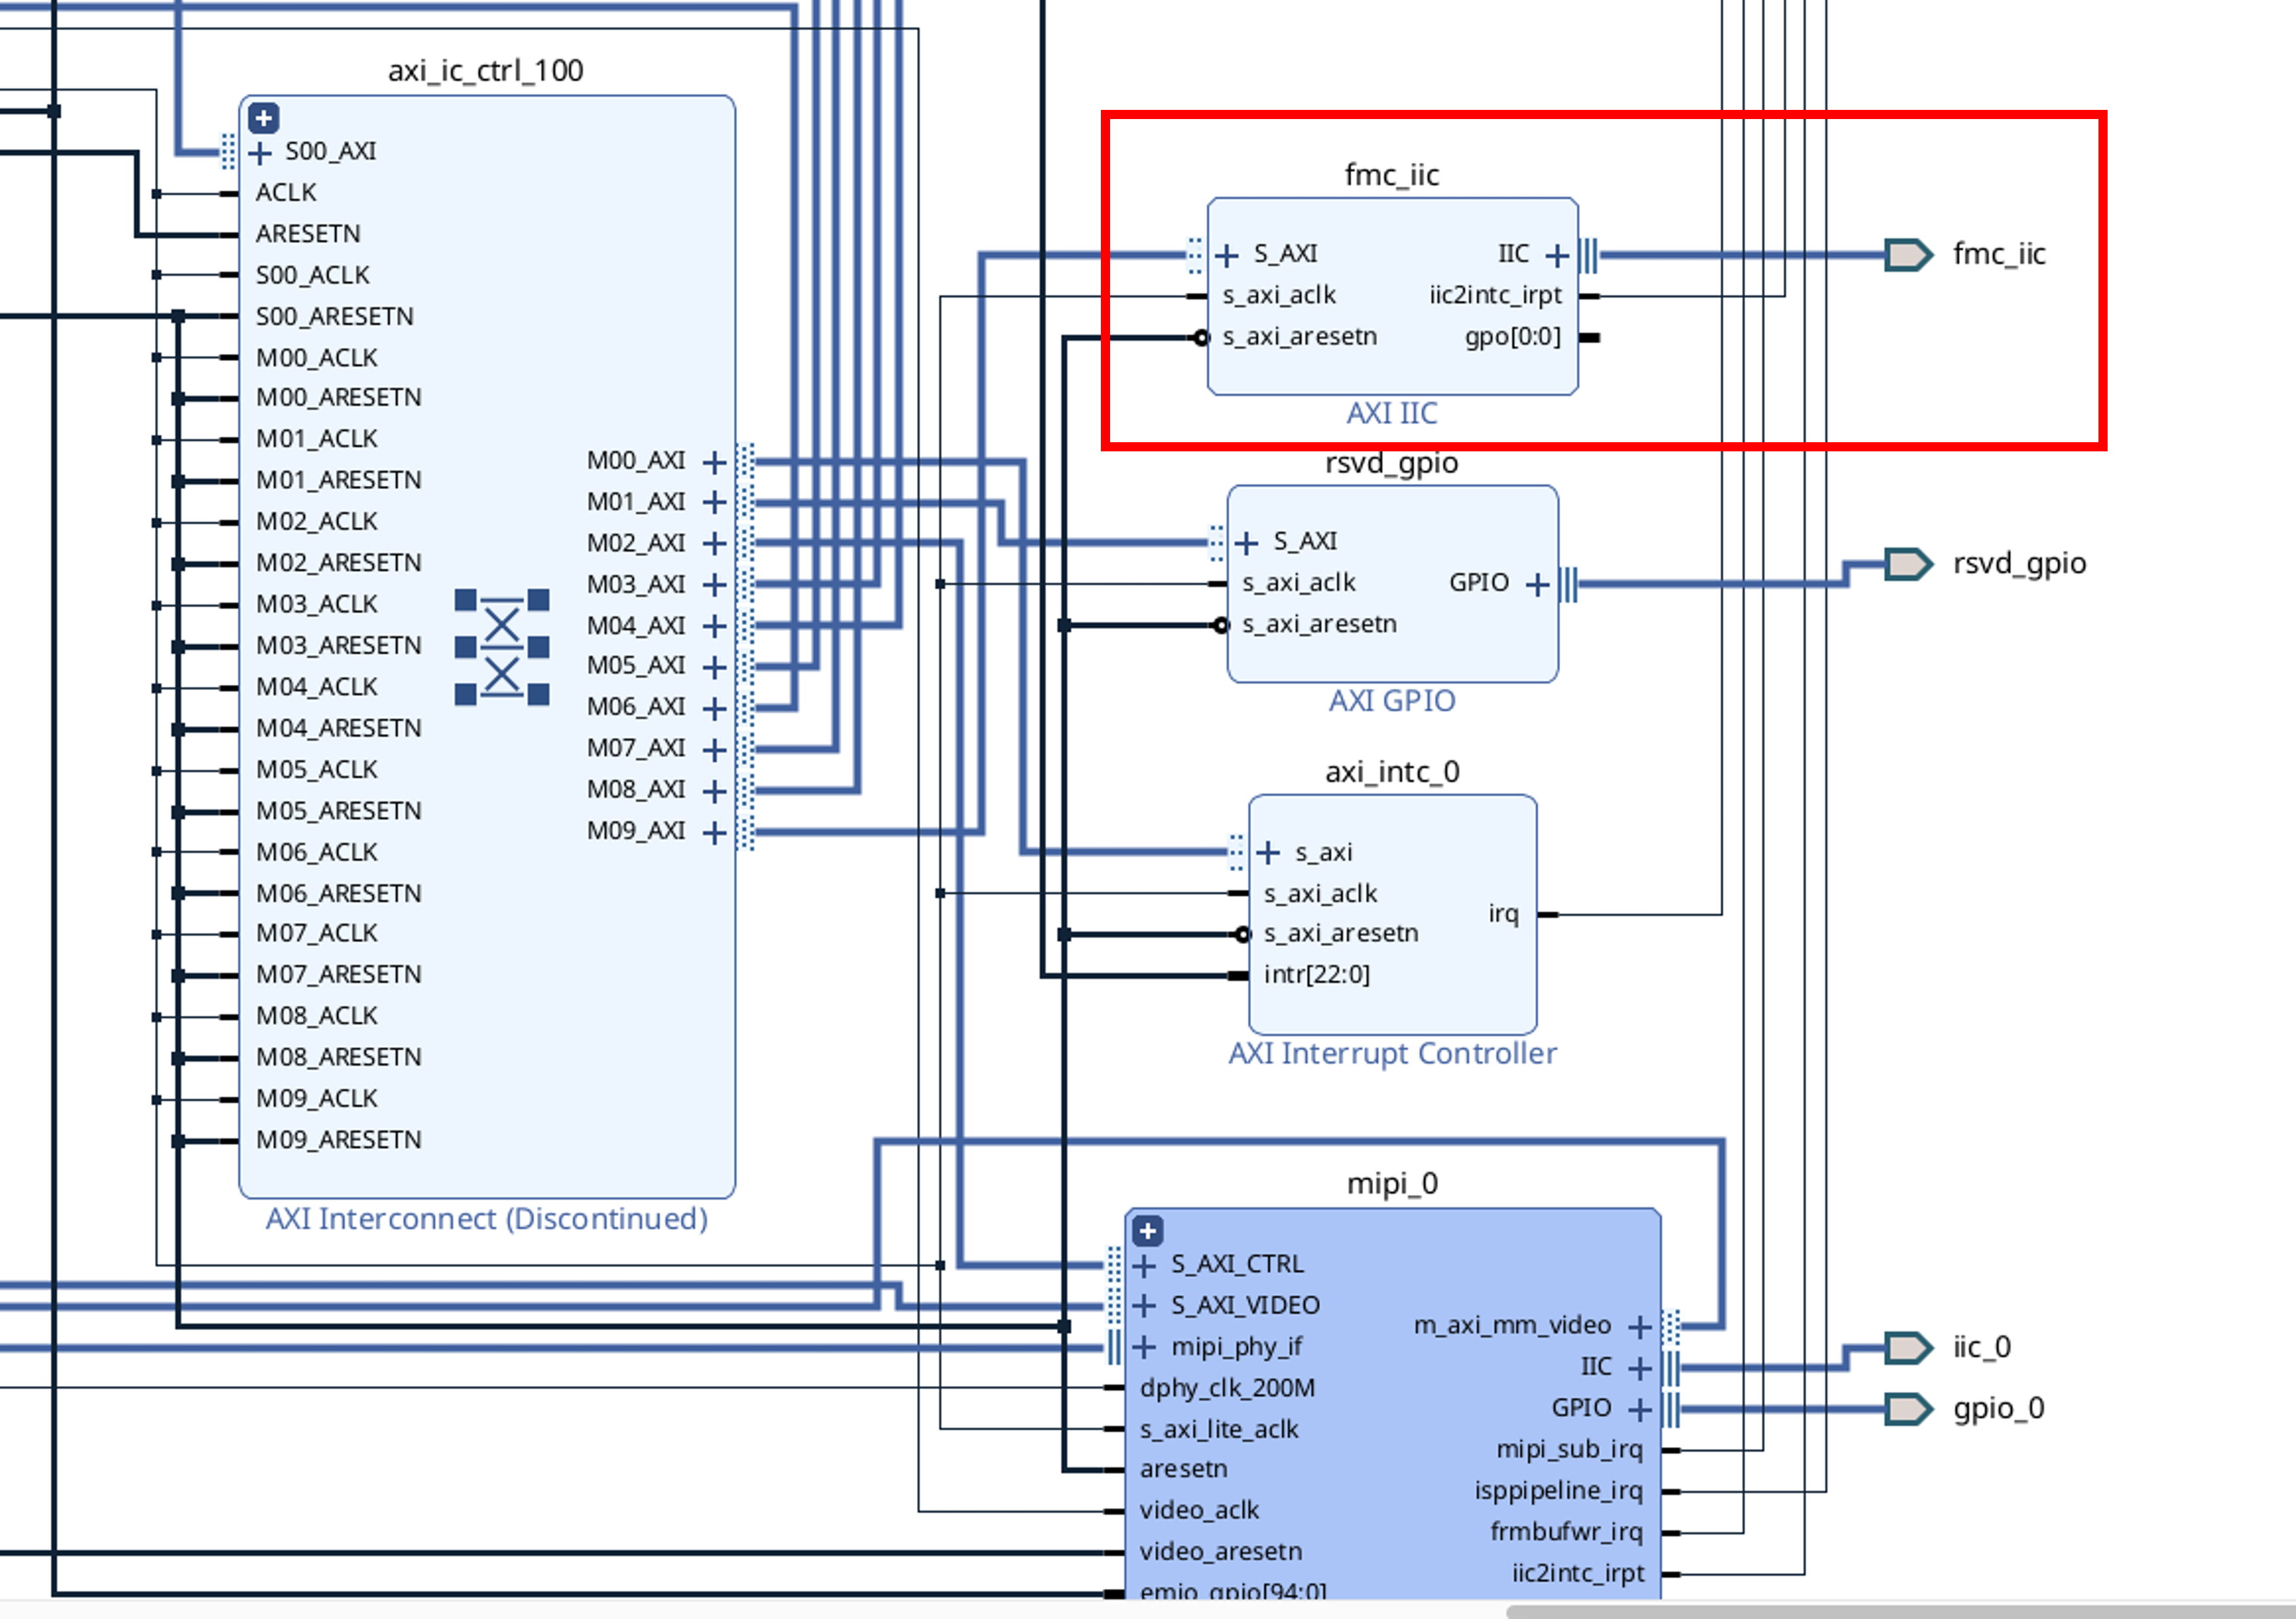
In order to control these I2C-based I/O pins, we need to add an I2C controller to the design. On the UltraZed-EV platform, the FMC I2C is mapped to PL I/O, so an AXI I2C controller had to be added to the design:
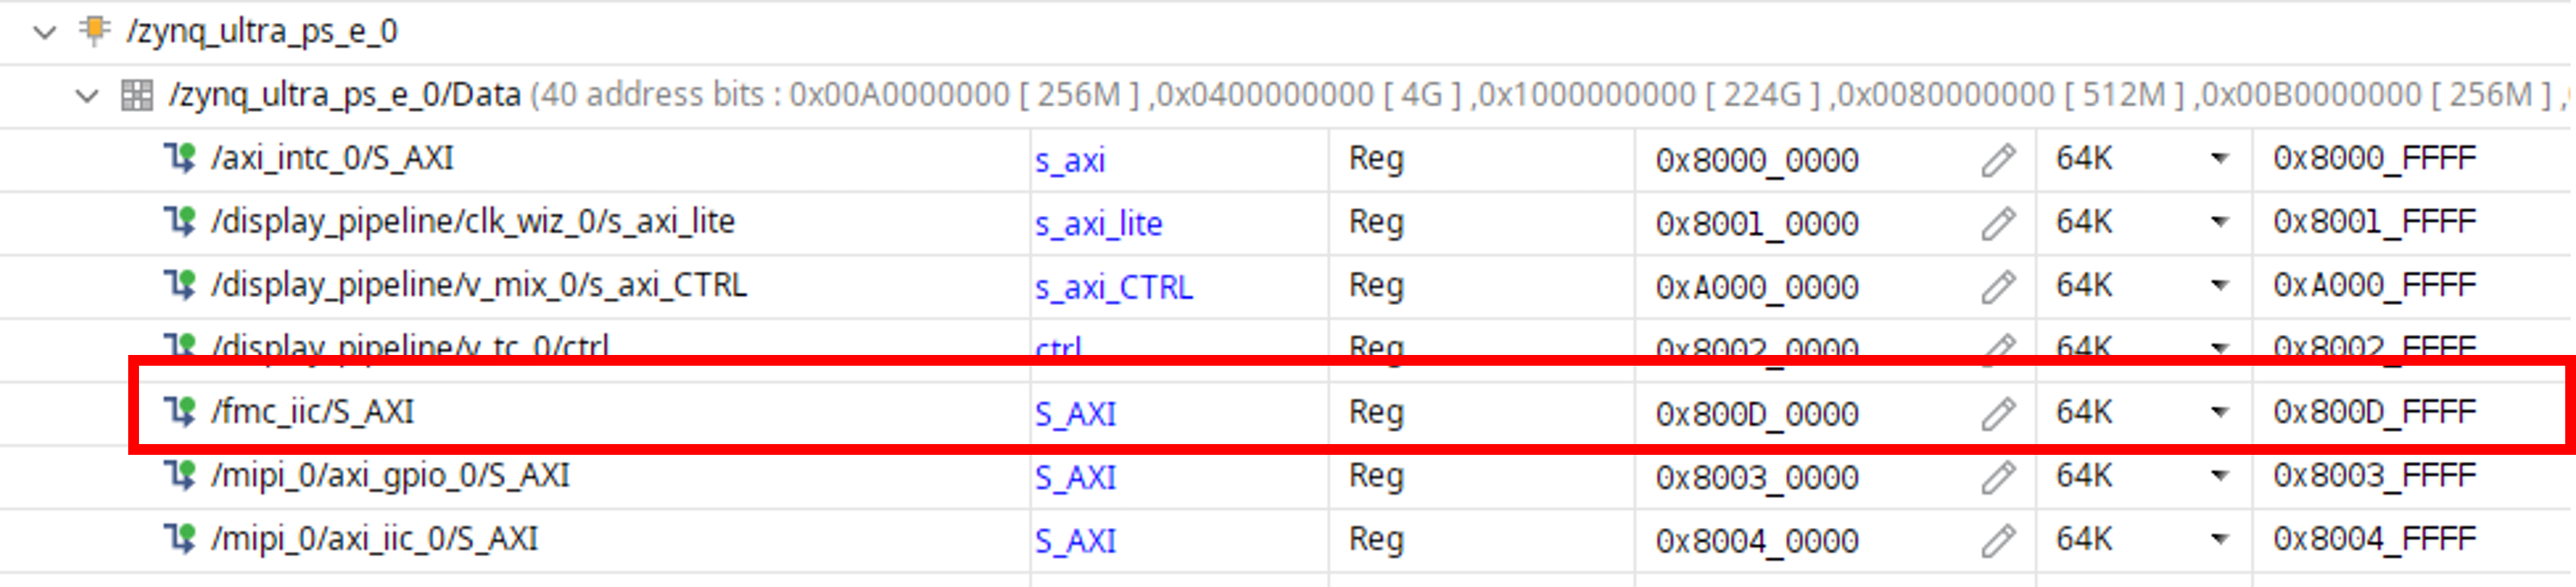
This new AXI peripheral needs to be assigned an address in the Address Editor:
The following constraints had to also be added to the design:
...

# These constraints apply to the UltraZed-EV Carrier with M2 M-key Stack FMC using 2x M.2 slots
# ---------------------------------------------------------------------------------------------

# I2C signals for M.2 Stack FMC I2C expander
set_property PACKAGE_PIN J12 [get_ports fmc_iic_scl_io]; # FMC_SCL - HD_SE_22_N
set_property PACKAGE_PIN K13 [get_ports fmc_iic_sda_io]; # FMC_SDA - HD_SE_22_P
set_property IOSTANDARD LVCMOS12 [get_ports fmc_iic_*]
set_property SLEW SLOW [get_ports fmc_iic_*]
set_property DRIVE 4 [get_ports fmc_iic_*]

...
Finally, the contents of the FMC I2C chain had to be described in the device tree, which was also added to project-spec/meta-user/recipes-bsp/device-tree/files/system-user.dtsi:
/* AXI IIC driving FMC SCL/SDA (HD_SE_22_N/P) */

&fmc_iic {
    #address-cells = <1>;
    #size-cells = <0>;

    m2_perst: gpio@41 {
        compatible = "ti,tca9536";
        reg = <0x41>;
        gpio-controller;
        #gpio-cells = <2>;

        /* P0 = PERST_A#, P1 = PERST_B#  -> drive HIGH = module operational
         *                                  (LOW = hold module in reset)
         * P2 = PRSNT_M2C_L (input)      -> stacked-FMC present-detect, active low
         * Per OP073 truth table: PERST = 1 (HIGH) operational, 0 (LOW) in reset. */
        m2-perst-hog {
            gpio-hog;
            gpios = <0 GPIO_ACTIVE_HIGH>, <1 GPIO_ACTIVE_HIGH>;
            output-high;          /* both slots released from reset = operational */
            line-name = "m2-perst";
        };
    };
};
NOTE: The exact implementation for the FMC I2C will be different for each FMC carrier. The implementation I have described applies to the Tria UltraZed-EV SOM + Carrier Card. For the ZCU104 and ZCU106, the FMC I2C lines are mapped to the PS I2C1 interface, via an I2C mux.
In order to automate the assertion of these resets on power-on, I added them to the FSBL, by adding the following Yocto recipe:
$ tree project-spec/meta-user/recipes-bsp/embeddedsw/
project-spec/meta-user/recipes-bsp/embeddedsw/
├── files
│   └── xfsbl_hooks.c
└── fsbl-firmware_%.bbappend
The contents for these files can be found here:
NOTE: The exact implementation for the FSBL PERST# assertion will be different for each FMC carrier. The implementation I have described applies to the Tria UltraZed-EV SOM + Carrier Card. For the ZCU104, for example, there is also a fix for the VADJ voltage powering the FMC slot.
Although the other vendors do not require it, I apply a 1 second reset to each M.2 slot at every boot. With this modification, the DeepX M1 is detected along with the others:
Zynq MP First Stage Boot Loader
Release 2025.2   Nov 13 2025  -  10:49:34
[PERST] hook start: IIC base=0x800D0000 exp=0x41 mask=0x03
[PERST] input=0xFF  PRSNT_M2C_L(P2)=1 (0=present)
[PERST] wr reg=0x01 data=0x00 OK
[PERST] wr reg=0x03 data=0xFC OK
[PERST] both asserted LOW (in reset), holding 1s
[PERST] wr reg=0x01 data=0x03 OK
[PERST] de-asserted HIGH (operational), settle 100ms
[PERST] sequence OK
[PERST] hook done

...

[    2.258107] pci 0000:01:00.0: [1ff4:0000] type 00 class 0x120000 PCIe Endpoint
[    2.265261] pci 0000:01:00.0: BAR 0 [mem 0x00000000-0x007fffff 64bit pref]
[    2.272119] pci 0000:01:00.0: BAR 2 [mem 0x00000000-0x000fffff]
[    2.278035] pci 0000:01:00.0: BAR 3 [mem 0x00000000-0x0000ffff]
[    2.283951] pci 0000:01:00.0: BAR 4 [mem 0x00000000-0x00000fff]
[    2.289867] pci 0000:01:00.0: BAR 5 [mem 0x00000000-0x0000ffff]
[    2.295948] pci 0000:01:00.0: supports D1
[    2.299778] pci 0000:01:00.0: PME# supported from D0 D1 D3hot
[    2.305853] pci_bus 0000:01: busn_res: [bus 01-ff] end is updated to 01
[    2.312152] pci 0000:00:00.0: bridge window [mem 0x540000000-0x5407fffff 64bit pref]: assigned
[    2.320753] pci 0000:00:00.0: bridge window [mem 0xb0000000-0xb01fffff]: assigned
[    2.328232] pci 0000:01:00.0: BAR 0 [mem 0x540000000-0x5407fffff 64bit pref]: assigned
[    2.336159] pci 0000:01:00.0: BAR 2 [mem 0xb0000000-0xb00fffff]: assigned
[    2.342935] pci 0000:01:00.0: BAR 3 [mem 0xb0100000-0xb010ffff]: assigned
[    2.349722] pci 0000:01:00.0: BAR 5 [mem 0xb0110000-0xb011ffff]: assigned
[    2.356506] pci 0000:01:00.0: BAR 4 [mem 0xb0120000-0xb0120fff]: assigned
[    2.363293] pci 0000:00:00.0: PCI bridge to [bus 01]
[    2.368250] pci 0000:00:00.0:   bridge window [mem 0xb0000000-0xb01fffff]
[    2.375035] pci 0000:00:00.0:   bridge window [mem 0x540000000-0x5407fffff 64bit pref]

...

[   12.771342] dx_dma_pcie 0000:01:00.0: dw->dx_ver: 3
[   13.158000] debugfs: Directory '0000:01:00.0' with parent 'dmaengine' already present!
[   13.166671] dx_dma_pcie 0000:01:00.0: [dx_dma_pcie_probe] Probe Done!!

...

root@mb-edgeai-uzev-2025-2:~# lspci
0000:00:00.0 PCI bridge: Xilinx Corporation SmartSSD
0000:01:00.0 Processing accelerators: DEEPX Co., Ltd. DX_M1 (rev 01)
0001:00:00.0 PCI bridge: Xilinx Corporation SmartSSD
0002:00:00.0 PCI bridge: Xilinx Corporation Device d021
...
Now that we have our embedded platform upgraded for use with multiple M.2 AI accelerator vendors, let’s circle back and describe how each vendor’s Yocto recipes were integrated.
Adding support for M.2 AI Accelerators
This section describes how the driver, runtime, and APIs were installed for each vendor.
Hailo (Hailo-8)
Yocto Integration
- Repo: https://github.com/hailo-ai/meta-hailo
- Branch used:
hailo8-scarthgap
The first step is to clone the meta-hailo repo to our petalinux project:
cd project-spec

git clone --recursive https://github.com/hailo-ai/meta-hailo --branch hailo8-scarthgap

cd ..
The original repo places meta-hailo in the project-spec/meta-user sub-directory. I prefer to put it directly under project-spec, in parallel with meta-user. But that is simply a preference.
The next step is to declare these meta layers in project-spec/configs/config:
#
# User Layers
#
CONFIG_USER_LAYER_0="${PROOT}/project-spec/meta-hailo/meta-hailo-accelerator"
CONFIG_USER_LAYER_1="${PROOT}/project-spec/meta-hailo/meta-hailo-libhailort"
CONFIG_USER_LAYER_2="${PROOT}/project-spec/meta-hailo/meta-hailo-tappas"
CONFIG_USER_LAYER_3=""
Then we need to declare the packages defined by these meta layers in
project-spec/meta-user/conf/user-rootfsconfig:
...

# Hailo

CONFIG_hailo-pci
CONFIG_hailo-firmware

CONFIG_hailortcli
CONFIG_libhailort
CONFIG_pyhailort
CONFIG_libgsthailo

CONFIG_libgsthailotools
CONFIG_hailo-post-processes

CONFIG_packagegroup-hailo-hailort
CONFIG_packagegroup-hailo-tappas

...
Finally, we enable these packages in project-spec/config/rootfs_config:
...

#
# user packages
#
...
CONFIG_hailo-pci=y
CONFIG_hailo-firmware=y
CONFIG_hailortcli=y
CONFIG_libhailort=y
CONFIG_pyhailort=y
CONFIG_libgsthailo=y
CONFIG_libgsthailotools=y
CONFIG_hailo-post-processes=y
CONFIG_packagegroup-hailo-hailort=y
CONFIG_packagegroup-hailo-tappas=y
...
This will install the full integration of Hailo’s driver, run-time, and APIs.
Detecting the module
We can detect the presence of the Hailo-8 accelerator module as follows:
# hailortcli fw-control identify
Executing on device: 0000:01:00.0
Identifying board
Control Protocol Version: 2
Firmware Version: 4.23.0 (release,app,extended context switch buffer)
Logger Version: 0
Board Name: Hailo-8
Device Architecture: HAILO8
Serial Number: HLLWM2B225101642
Part Number: HM218B1C2FAE
Product Name: HAILO-8 AI ACC M.2 M KEY MODULE EXT TEM
Benchmarking ResNet-50
The resnet model can be benchmarked as follows:
# wget https://hailo-model-zoo.s3.eu-west-2.amazonaws.com/ModelZoo/Compiled/v2.19.0/hailo8/resnet_v1_50.hef

# hailortcli --benchmark resnet_v1_50.hef
A subcommand is required
Run with --help for more information.
root@mb-edgeai-zcu104-20252:~# hailortcli benchmark resnet_v1_50.hef
Starting Measurements...
Measuring FPS in HW-only mode
...
Measuring FPS (and Power on supported platforms) in streaming mode
...
Measuring HW Latency
...

=======
Summary
=======
FPS     (hw_only)                 = 1370.37
        (streaming)               = 1371.51
Latency (hw)                      = 3.09555 ms
Device 0000:01:00.0:
  Power in streaming mode (average) = 3.95818 W
                          (max)     = 4.01291 W
Axelera (Metis)
Yocto Integration
- Repo: https://github.com/axelera-ai-hub/meta-axelera
- Branch used:
yocto/scarthgap
The first step is to clone the meta-axelera repo to our petalinux project:
cd project-spec

git clone --recursive https://github.com/axelera-ai-hub/meta-axelera --branch yocto/scarthgap

cd ..
The next step is to declare these meta layers in project-spec/configs/config:
#
# User Layers
#
...
CONFIG_USER_LAYER_3="${PROOT}/project-spec/meta-axelera"
CONFIG_USER_LAYER_4=""
Then we need to declare the packages defined by these meta layers in project-spec/meta-user/conf/user-rootfsconfig:
...

# Axelera

CONFIG_axelera-driver
CONFIG_axelera-udev-rules

...
Finally, we enable these packages in project-spec/config/rootfs_config:
...

#
# user packages
#
...
CONFIG_axelera-driver=y
CONFIG_axelera-udev-rules=y
...
This will install Axelera’s driver.
Installing the Voyager-SDK
Axelera does not provide Yocto recipes for their run-time and APIs. Instead, these are made available as python wheels which can be installed directly on the embedded platform after initial boot:
# python3 -m venv ~/venv_axelera
# source ~/venv_axelera/bin/activate

(venv_axelera) # pip install --extra-index-url https://software.axelera.ai/artifactory/api/pypi/axelera-pypi/simple axelera-rt
With this, Axelera’s runtime and APIs are available in a Python virtual environment on the embedded platform.
Detecting the module
The Axelera Metis module can be detected with the axdevice utility:
(venv_axelera) # axdevice
[  103.658636] axl 0000:01:00.0: vmsi configured
[  103.663063] axl 0000:01:00.0: fwtrace: detached for firmware reload
[  103.968681] axl 0000:01:00.0: vmsi configured
[  103.973107] axl 0000:01:00.0: fwtrace: detached for firmware reload
Device 0: metis-0:1:0 1GiB metis-m2 flver=1.3.2 bcver=1.4 clock=800MHz mvm=100%
Benchmarking ResNet-50
The resnet model can be benchmarked as follows:
(venv_axelera) # axdownloadmodel --axm resnet50-imagenet
Downloaded and created /root/resnet50-imagenet.axm in /root

(venv_axelera) # axrunmodel resnet50-imagenet.axm -v
INFO:axelera.runtime:Found AIPU driver: metis                 114688  0
INFO:axelera.runtime:Firmware version matches: v1.7.0
INFO:axelera.runtime:Using device metis-0:1:0
[  171.202688] axl 0000:01:00.0: fwtrace: datastream attached
INFO:axelera.runtime:Firmware version matches: v1.7.0
INFO:axelera.runtime.run:Creating 4 model instances each with batch size of 1 on 1 device(s)
INFO:axelera.runtime.run:Starting with prefill=8, drop=8, batch_size=1, and len(workers)=4
INFO:axelera.runtime.run:Stopping inference after 10.03 seconds
INFO:axelera.runtime.run:Joined all threads after 0.00 seconds
INFO:axelera.runtime.run:Closed all contexts after 0.29 seconds
INFO:axelera.runtime.utils:device latency(ms): 0.004013 nsamples=3922 min=2.4 max=5.6 mean_l=3.9
INFO:axelera.runtime.utils:host latency(ms): 0.006471 nsamples=4025 min=3.5 max=56.3 mean_l=6.9
resnet50-imagenet.axm,dev:1014.1 host:580.1 system:500.9 latency:30.0ms frames:5023 temp:35C
At 500.9 FPS on ResNet-50, the Axelera Metis is delivering real sustained throughput on the ZCU104. Of the three FPS figures reported by axrunmodel, dev and host are 1/execution_time reciprocals (device-only, and device-plus-PCIe-transfer respectively); system is real throughput (frames ÷ elapsed time). We use system in the summary below, since it matches how the other three vendors measure sustained throughput.
DeepX (M1)
Yocto Integration
- Repo: https://github.com/DEEPX-AI/meta-deepx-m1
- Branch used:
scarthgap
The first step is to clone the meta-deepx-m1 repo to our petalinux project:
cd project-spec

git clone --recursive https://github.com/DEEPX-AI/meta-deepx-m1 --branch scarthgap

cd ..
The next step is to declare these meta layers in project-spec/configs/config:
#
# User Layers
#
...
CONFIG_USER_LAYER_4="${PROOT}/project-spec/meta-deepx-m1"
CONFIG_USER_LAYER_5=""
Then we need to declare the packages defined by these meta layers in project-spec/meta-user/conf/user-rootfsconfig:
...
# DeepX

CONFIG_dx-driver
CONFIG_dx-rt
CONFIG_dx-stream
CONFIG_dx-stream-sample

...
Finally, we enable these packages in project-spec/config/rootfs_config:
...

#
# user packages
#
...
CONFIG_dx-driver=y
CONFIG_dx-rt=y
CONFIG_dx-stream=y
CONFIG_dx-stream-sample=y
...
This will install the full integration of DeepX’s driver, run-time, and APIs.
Launching the dxrtd service
The dx-rt runtime uses a client/service split: application code links against a client library that talks to a dxrtd inference service over IPC. The service is not auto-started at boot by any systemd unit shipped by meta-deepx-m1; it must be launched manually:
dxrtd &
Successful initialization loads the PPCPU firmware onto the device and starts the IPC server:
[DXRT_SVC][dxrt_service_main] Uses Default FIFO Scheduler
[DXRT_SVC][DxrtService] Initialized Devices count=1
[DXRT_SVC][DxrtService] Initialized Scheduler
[DXRT_SVC][DxrtService] Initialized IPC Server
[DXRT_SVC][DxrtService] Loading PPCPU Firmware for devices, Size: 3616 bytes
[DXRT_SVC][LoadPPCPUFirmware] PPCPU firmware loaded to device 0 successfully.
Without this step, any attempt to use dxbenchmark or dxrt-cli fails immediately:
[dxrt-exception] Service input & output exception {dxrt service is not running} error-code=264
DeepX’s client/service split is architecturally similar to MemryX’s mxa-manager pattern (also unique among the four vendors in this article). A future improvement to the meta-deepx-m1 recipe would be to package dxrtd as an auto-enabled systemd service.
Detecting the module
We can validate the presence of the DeepX M1 module as follows:
# dxrt-cli -i
DXRT v3.3.2
=======================================================
 * Device 0: M1, Accelerator type
---------------------   Version   ---------------------
 * RT Driver version   : v2.4.1
 * PCIe Driver version : v2.2.0
-------------------------------------------------------
 * FW version          : v2.5.0
--------------------- Device Info ---------------------
 * Memory : LPDDR5 5600 Mbps, 3.92GiB
 * Board  : M.2, Rev 1.0
 * Chip Offset : 0
 * PCIe   : Gen3 X4 [01:00:00]
Updating the firmware
The M1 module I received shipped with firmware v2.5.0, but the current dx-rt v3.3.2 runtime requires v2.5.2 or higher.
DeepX publishes firmware binaries in a dedicated GitHub repository at DEEPX-AI/dx_fw. Download the current M.2 firmware:
wget https://raw.githubusercontent.com/DEEPX-AI/dx_fw/main/m1/2.5.6/mdot2/fw.bin
Flash it with dxrt-cli --fwupdate (short option -u):
# dxrt-cli -u fw.bin
DXRT v3.3.2
Updating the M.2 device to firmware version 2.5.6.
Don't turn off the power until the firmware download is done.
============ FW Binary Information ============
Signature   : DEEPX GENESIS-M
Board Type  : M.2
DDR Type    : LPDDR5
Firmware Ver: 2.5.6
    Device 0: Update firmware[2.5.6] by fw.bin, SubCmd:none : SUCCESS
Reboot to reload the module with the new firmware:
reboot
The firmware update persists across reboots — it is stored on the M1 module, not in the rootfs. This is a one-time setup step per device.
# dxrt-cli -i
DXRT v3.3.2
=======================================================
 * Device 0: M1, Accelerator type
---------------------   Version   ---------------------
 * RT Driver version   : v2.4.1
 * PCIe Driver version : v2.2.0
-------------------------------------------------------
 * FW version          : v2.5.6
--------------------- Device Info ---------------------
 * Memory : LPDDR5 5600 Mbps, 3.92GiB
 * Board  : M.2, Rev 1.0
 * Chip Offset : 0
 * PCIe   : Gen3 X4 [01:00:00]
Benchmarking ResNet-50
The dxbenchmark tool needs both a compiled .dxnn model and its corresponding .json configuration, in the same directory:
mkdir -p bench/ResNet50

wget https://sdk.deepx.ai/modelzoo/dxnn/2_3_0/ResNet50.dxnn -O bench/ResNet50/ResNet50.dxnn
wget https://sdk.deepx.ai/modelzoo/json/ResNet50-1.json     -O bench/ResNet50/ResNet50-1.json
With resnet model artifacts downloaded, we can launch a benchmark session as follows:
# dxbenchmark --dir bench/ResNet50 --warmup 10 --time 30
Runtime Framework Version: v3.3.2
Device Driver Version: v2.4.1
PCIe Driver Version: v2.2.0

Device specification: 'all' (default)

=== Model File: /root/bench/ResNet50/ResNet50.dxnn ===

Model Input Tensors:
  - input.1
Model Output Tensors:
  - 495

Tasks:
  [ ] -> npu_0 -> []
  Task[0] npu_0, NPU, NPU memory usage 36485440 bytes (input 150528 bytes, output 4000 bytes)
  Inputs
     -  input.1, UINT8, [1, 224, 224, 3 ]
  Outputs
    -  495, FLOAT, [1, 1000 ]
The generated JSON report confirms the working configuration:
{
  "Runtime Version":       "3.3.2",
  "Firmware Version":      "2.5.6",
  "Device Driver Version": "2.4.1",
  "PCIe Driver Version":   "2.2.0",
  "results": [
    {
      "Model Name": "ResNet50.dxnn",
      "FPS": 1050.91,
      "NPU Inference Time": { "mean": 2.82, "sd": 0.08, "cv": 0.03 },
      "Latency":            { "mean": 5.60, "sd": 0.29, "cv": 0.05 }
    }
  ]
}
At 1050.91 FPS on ResNet-50, the DeepX M1 is delivering the expected performance for the M.2 form factor.
MemryX (MX3)
Yocto Integration
- Repo: https://github.com/memryx/memx-yocto
- Branches available:
main,renesas(vendor port); one tag:v2.1.0
The repo ships two sublayers (meta-mx3-driver for the kernel module and meta-memx-runtime for the MxAccl C++ runtime + libmemx), and each declares its compatible Yocto releases inline in conf/layer.conf:
LAYERSERIES_COMPAT_meta-mx3-driver  = "mickledore styhead walnascar"
LAYERSERIES_COMPAT_meta-memx-runtime = "mickledore styhead walnascar"
The chronology is worth pausing on:
| Yocto release | Date | MemryX layer support |
|---|---|---|
| kirkstone | 2022-04 | ✗ (LTS — skipped) |
| mickledore | 2023-04 | ✓ |
| scarthgap | 2024-04 | ✗ (LTS — skipped) |
| styhead | 2024-10 | ✓ |
| walnascar | 2025-04 | ✓ |
I was curious to know why MemryX is choosing to skip LTS versions. Turns out there is no pattern to find. MemryX simply concentrates on the versions that its clients are requesting. Nobody has asked them for scarthgap yet, so this one is an opportunity to learn.
For this project/article, I chose to fork their repo in order to capture my work in a branch:
- Repo: https://github.com/AlbertaBeef/memx-yocto
- Branch:
mb-edgeai-amd-petalinux-2025-2
The first step was to add “scarthgap” to the LAYERSERIES_COMPAT_meta-mx3-driver and LAYERSERIES_COMPAT_meta-memx-runtime declarations.
LAYERSERIES_COMPAT_meta-mx3-driver  = "mickledore scarthgap styhead walnascar"
LAYERSERIES_COMPAT_meta-memx-runtime = "mickledore scarthgap styhead walnascar"
The second step was to compile the meta-mx3-driver package. The only issue I ran into was that the memx-cascade-plus-pcie_2.1.0.bb recipe did not support being compiled on a different PC (i.e. cross-compilation). This was easily fixed as described in these two commits:
- meta-mx3-driver modifications:
Next, was the meta-memx-runtime package. For this one, I encountered the following issues:
- change of license from MIT license to MPL 2.0 license
- installation of libmemx.so.2, which was no longer present in build artifacts
- installation of MXA Manager, which was broken for my system
While I was at it, I also implemented the following:
- added recipe to auto-start MXA Manager at boot
The changes are implemented in the following two commits:
- meta-memx-runtime modifications:
This installs the MX3 driver and MemryX runtime.
Validating the MXA Manager
We can validate that the MXA Manager has been auto-started as follows:
# systemctl is-enabled mxa-manager
enabled

# systemctl status mxa-manager
* mxa-manager.service - MemryX MXA Manager daemon (owns the MX3, serves clients over /run/mxa_m>
     Loaded: loaded (8;;file://mb-edgeai-zcu104-20252/usr/lib/systemd/system/mxa-manager.servic;
     Active: active (running) since Wed 2026-07-08 20:59:07 UTC; 30s ago
       Docs: 8;;https://developer.memryx.comhttps://developer.memryx.com8;;8;;
   Main PID: 808 (mxa_manager)
      Tasks: 6 (limit: 524)
     Memory: 3.2M (peak: 3.7M)
        CPU: 112ms
     CGroup: /system.slice/mxa-manager.service
             `-808 /usr/bin/mxa_manager

# ls -l /run/mxa_manager/
total 0
srwxrwxrwx 1 root root 0 Jul  8 20:59 10000.sock
srwxrwxrwx 1 root root 0 Jul  8 20:59 10001.sock
srwxrwxrwx 1 root root 0 Jul  8 20:59 10002.sock
Installing the Python virtual environment
We also want to install the Python APIs, which can be done in a virtual environment. Be patient, the following installation will take a LOOOOONG time …
# python3 -m venv ~/venv_mx3

# source ./venv_mx3/bin/activate

(venv_mx3) # pip3 install --extra-index-url https://developer.memryx.com/pip memryx
Detecting the module
With this virtual environment installed, MemryX’s mx_* utilities are available on the embedded platform.
(venv_mx3) # mx_nc --version
2.2.2

(venv_mx3) # mx_bench --hello


Hello from MXA!

Device ID | Chip Count |  Freq | Volt
----------|------------|-------|-----
        0 |          4 |   600 |  700
Benchmarking ResNet-50
As a final test, we can download a model and perform a benchmark:
(venv_mx3) # wget https://developer.memryx.com/model_explorer/2p2/ResNet_50_MXA_Optimized_224_224_3_onnx.zip

(venv_mx3) # unzip ResNet_50_MXA_Optimized_224_224_3_onnx.zip

(venv_mx3) # mx_bench --dfp ResNet_50_MXA_Optimized_224_224_3_onnx.dfp

Ran 500 frames
  Model: 0
  Average FPS: 1007.27
  Average System Latency: 4.63 ms
Capturing all the work in one repo
In order to capture all the work that was accomplished in this article, I created a repo based on Jeff Johnson’s most recent content from end of June 2026.
Instead of “zynqmp-hailo-ai”, I named the repo “mb-edge-zynqmp”, dropped support for the pynqzu board, and incorporated the changes I described in this article.
Known Issues
Most of the M.2 AI accelerators I tested had unusual mechanical additions for their thermal dissipation solution. Of the four, only Hailo-8 had a proper M.2 M-Key form factor. All other three had a metal casing that wrapped the module, resulting in a form factor that is essentially “out of spec” for a M.2 M-Key module.
The following image shows how the M.2 Stack FMC’s components are in mechanical contact with these metal casings:
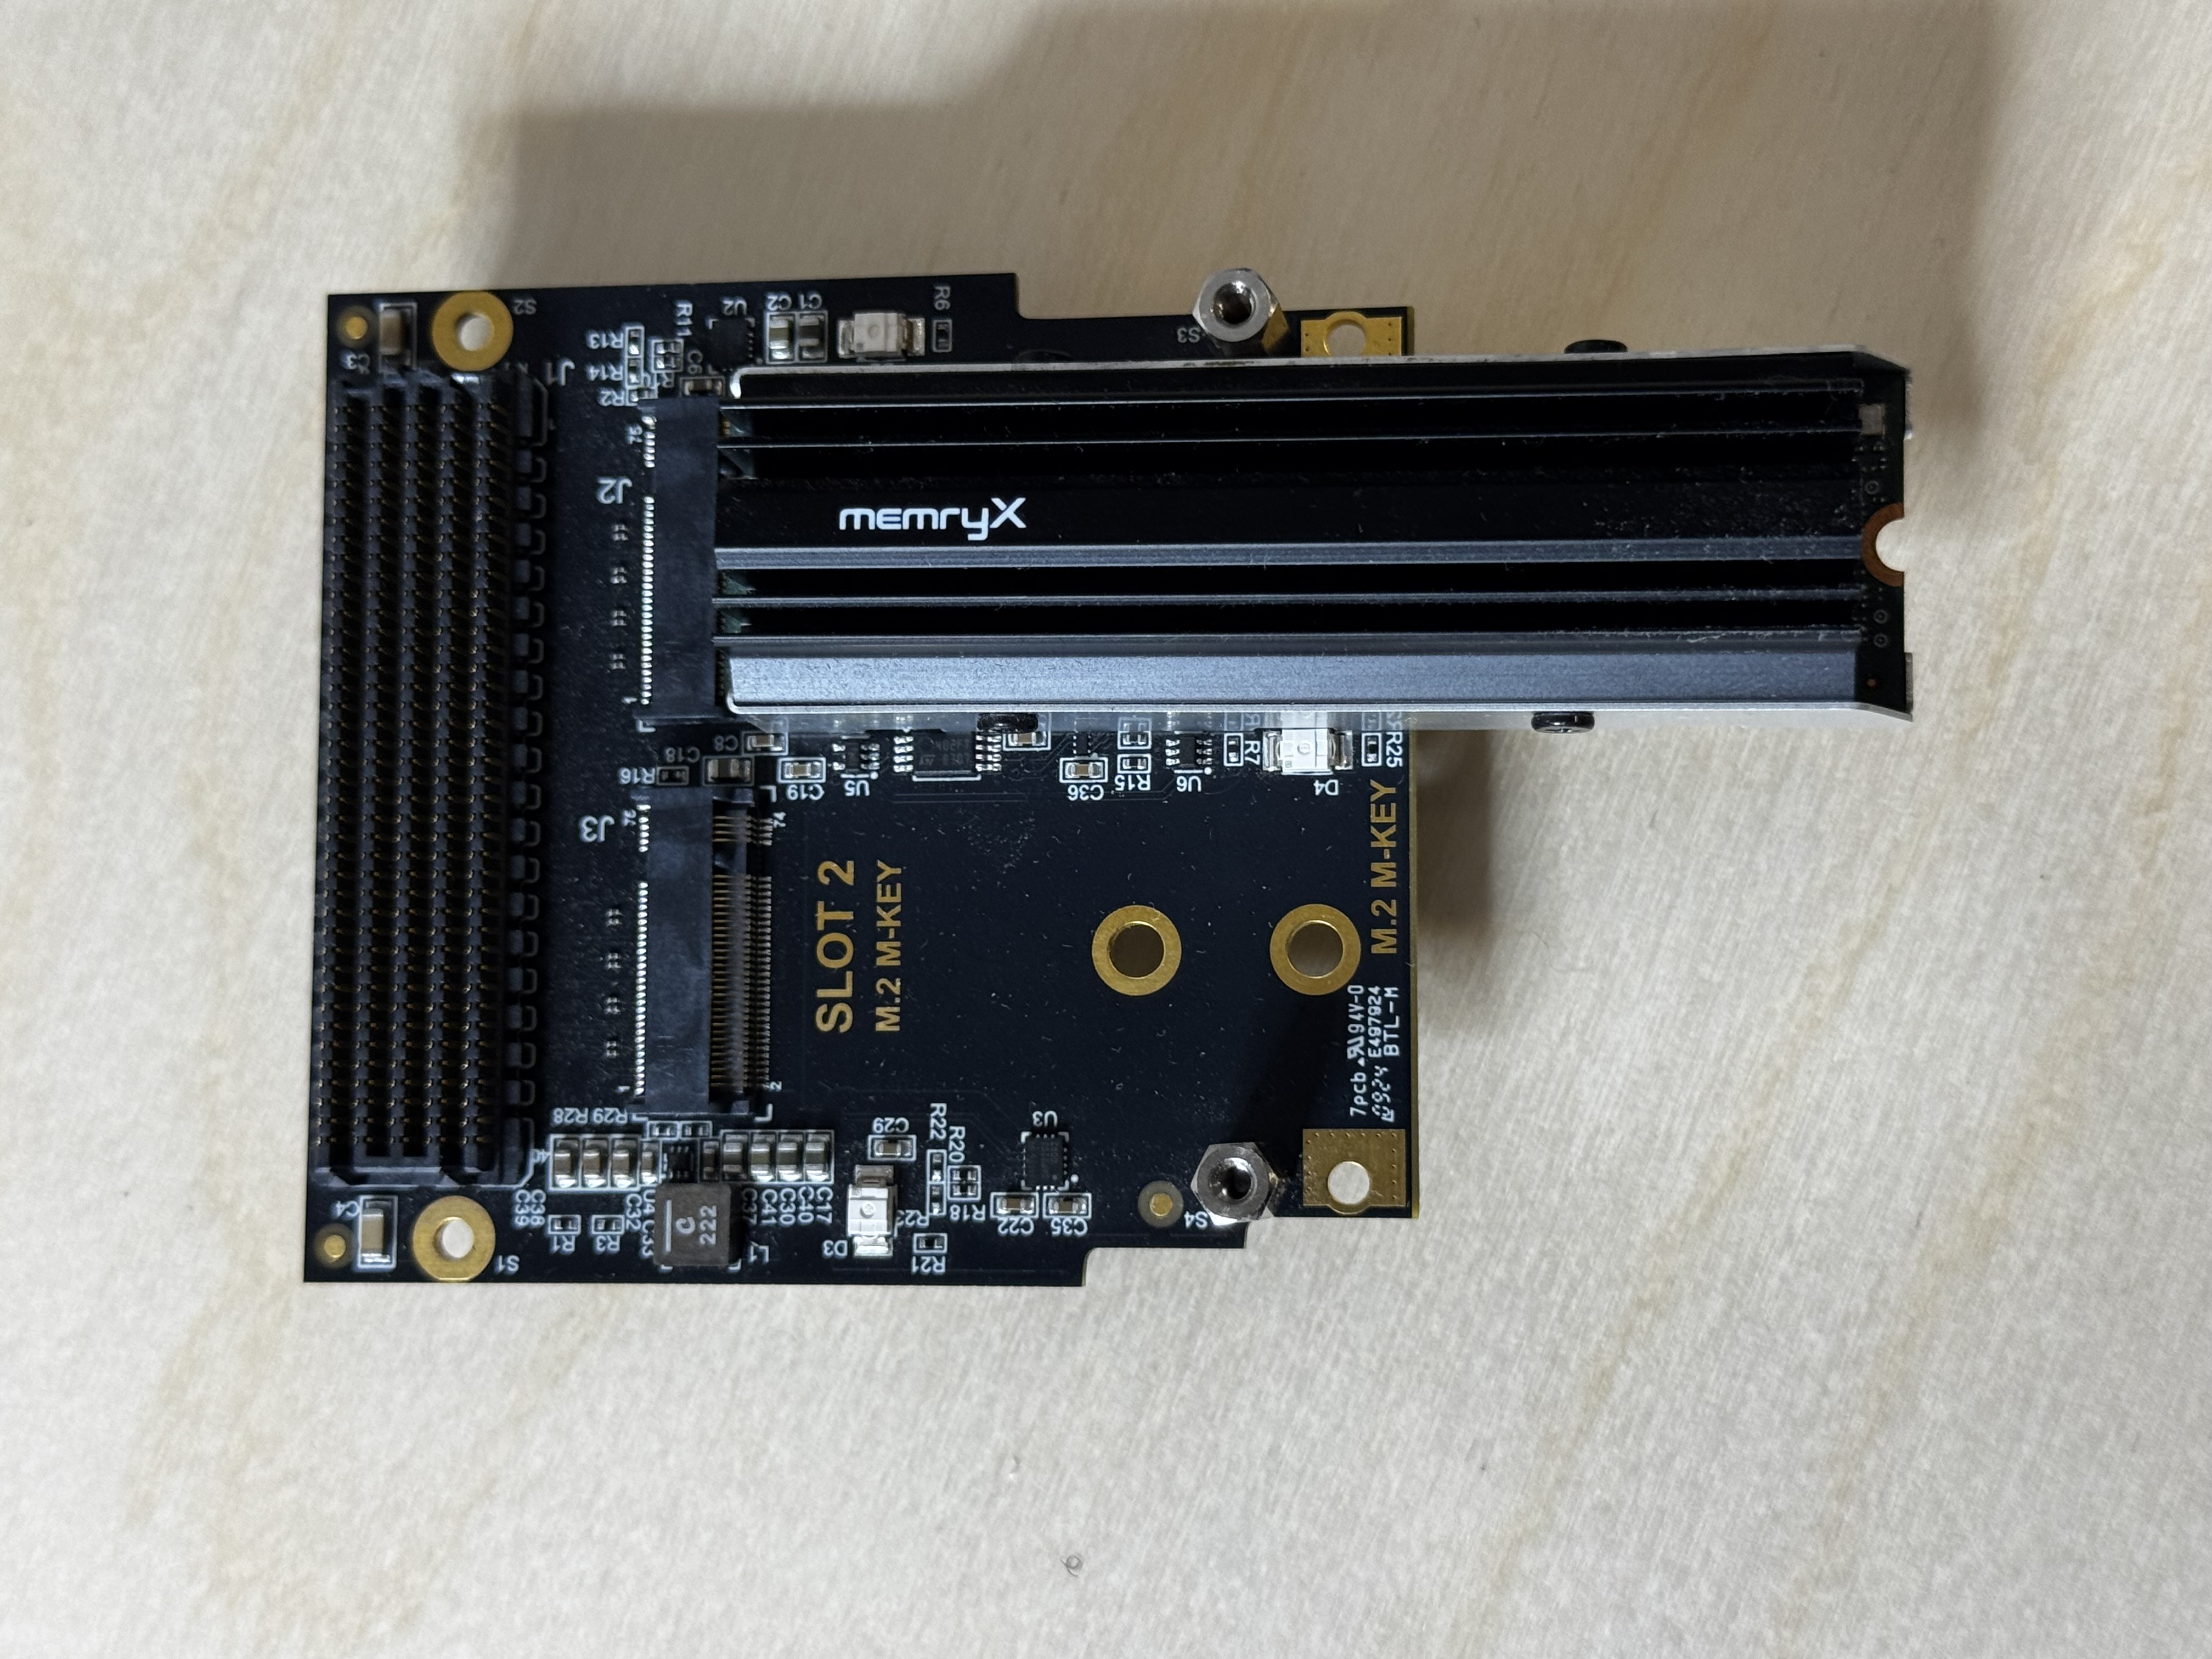
In order to prevent short circuits, I placed a business card between the M.2 Stack FMC, and the M.2 AI accelerators:
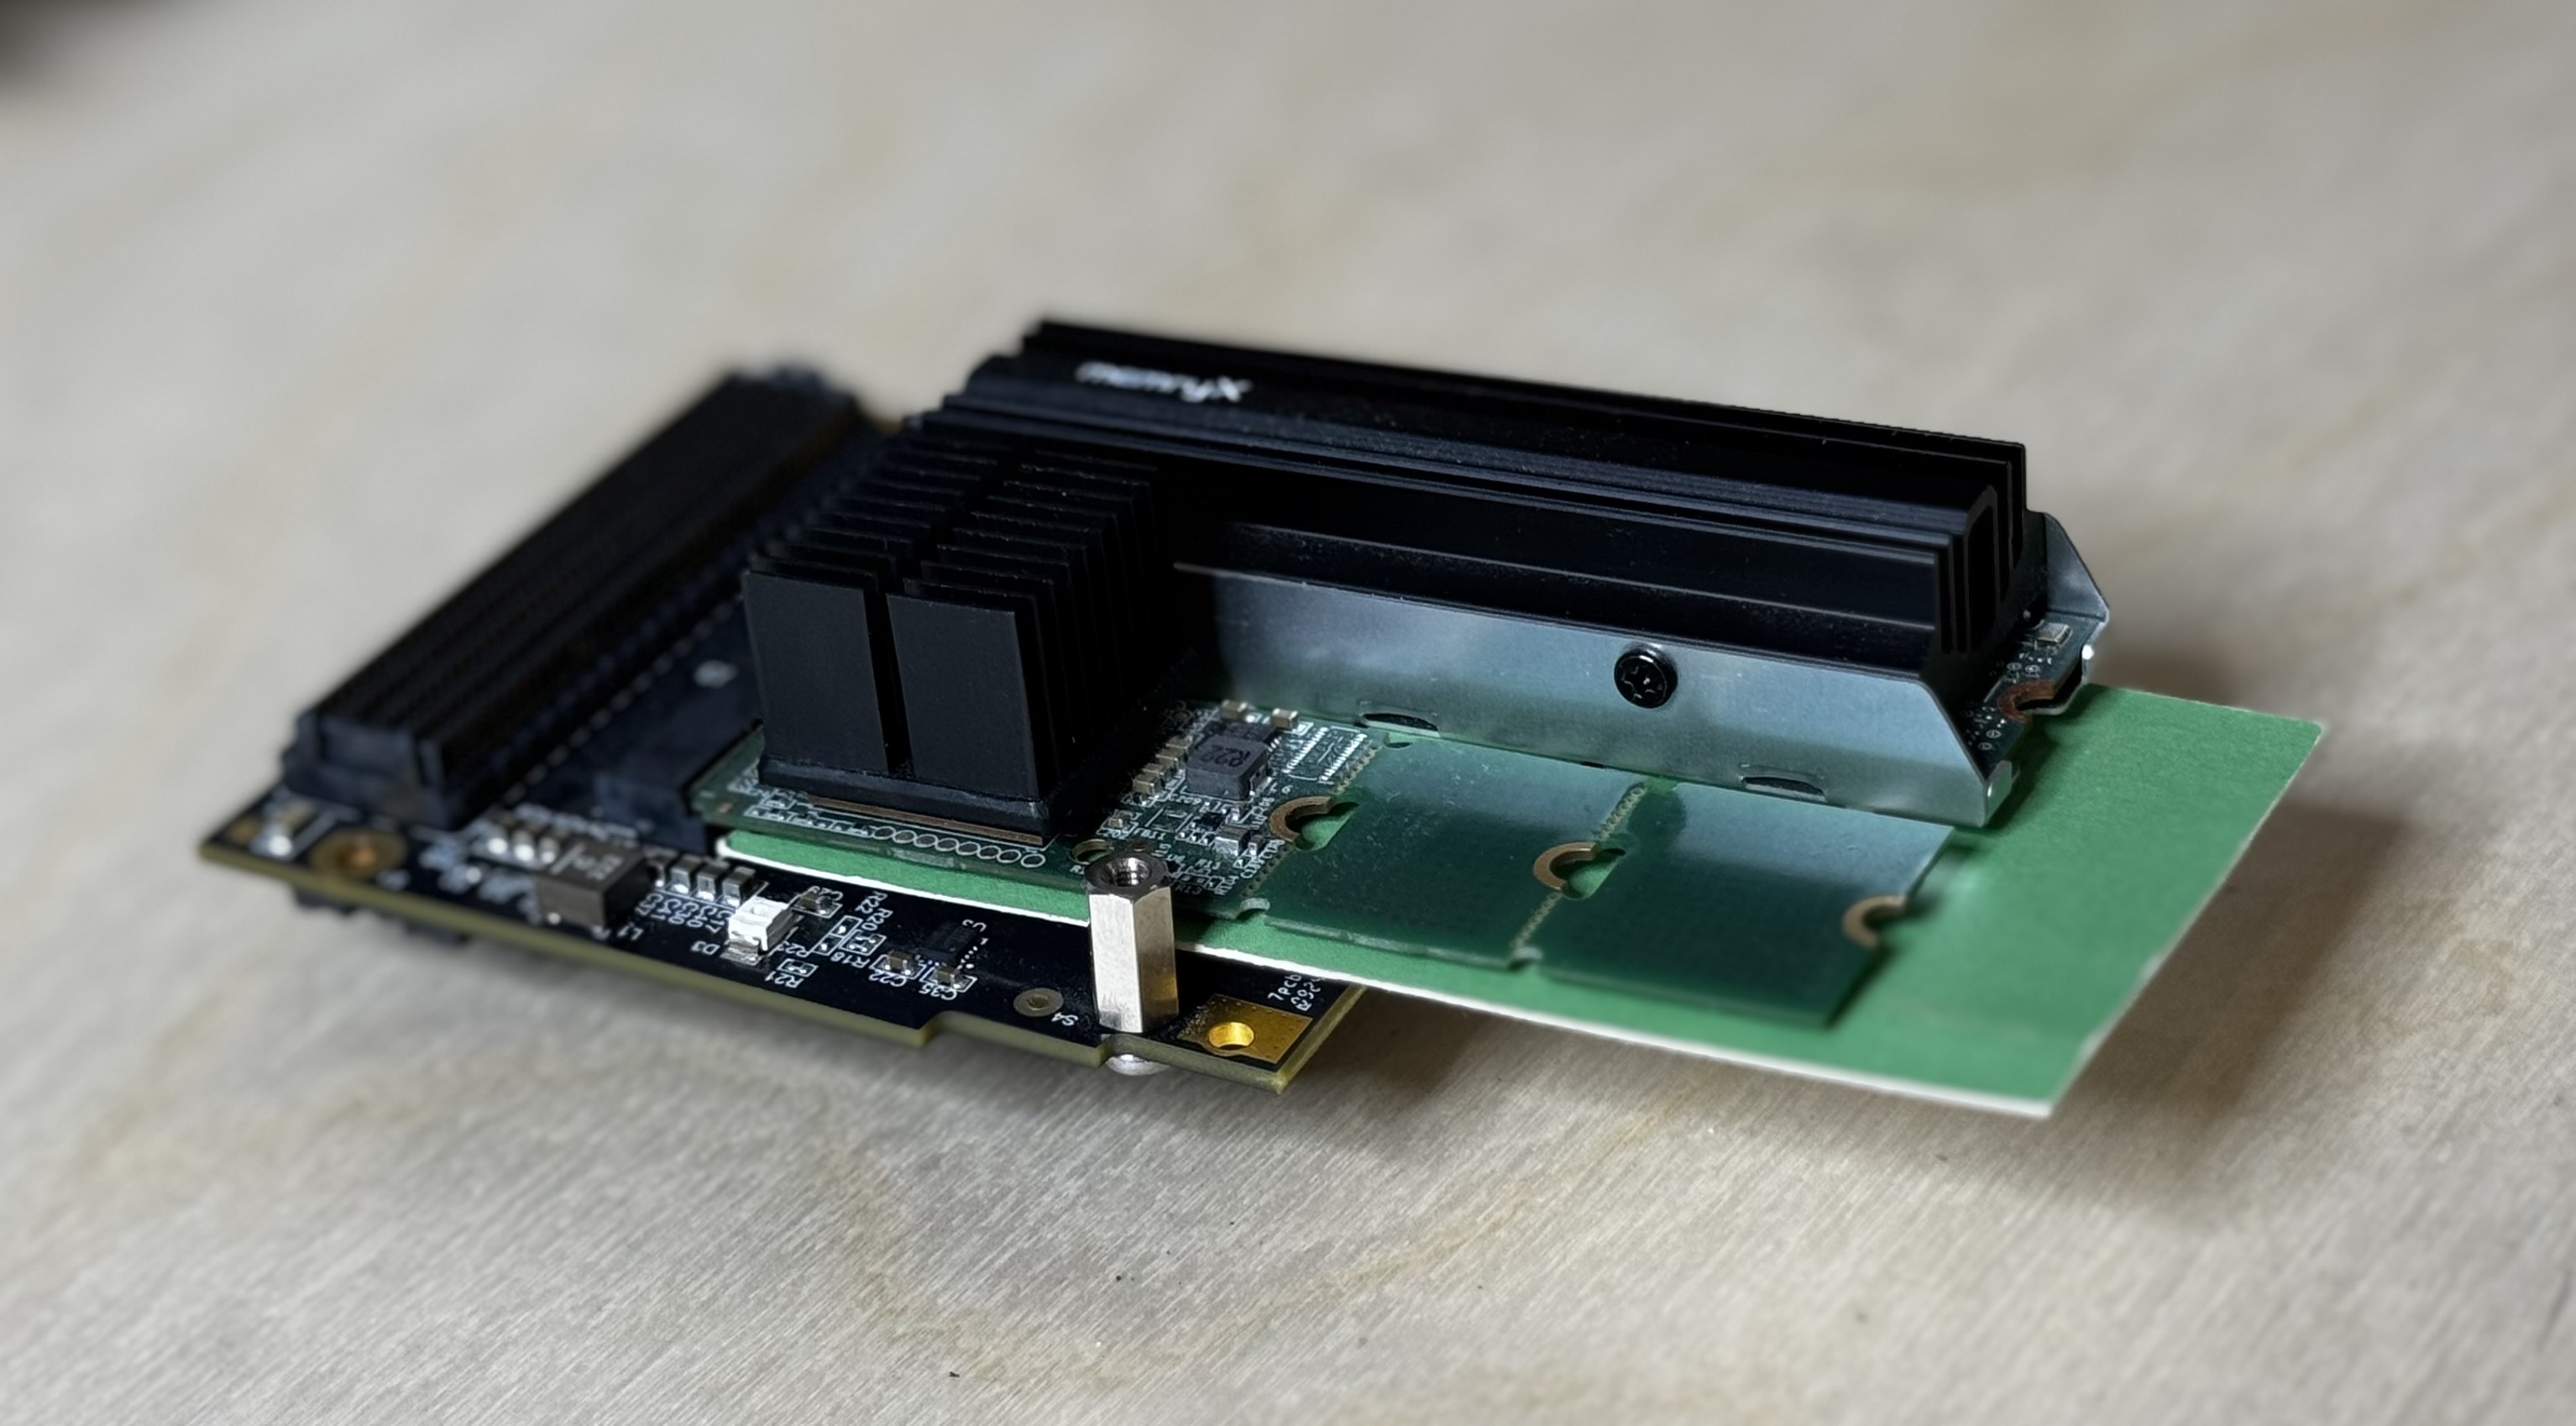
Although not ideal, this is what my setup looked like for this article:
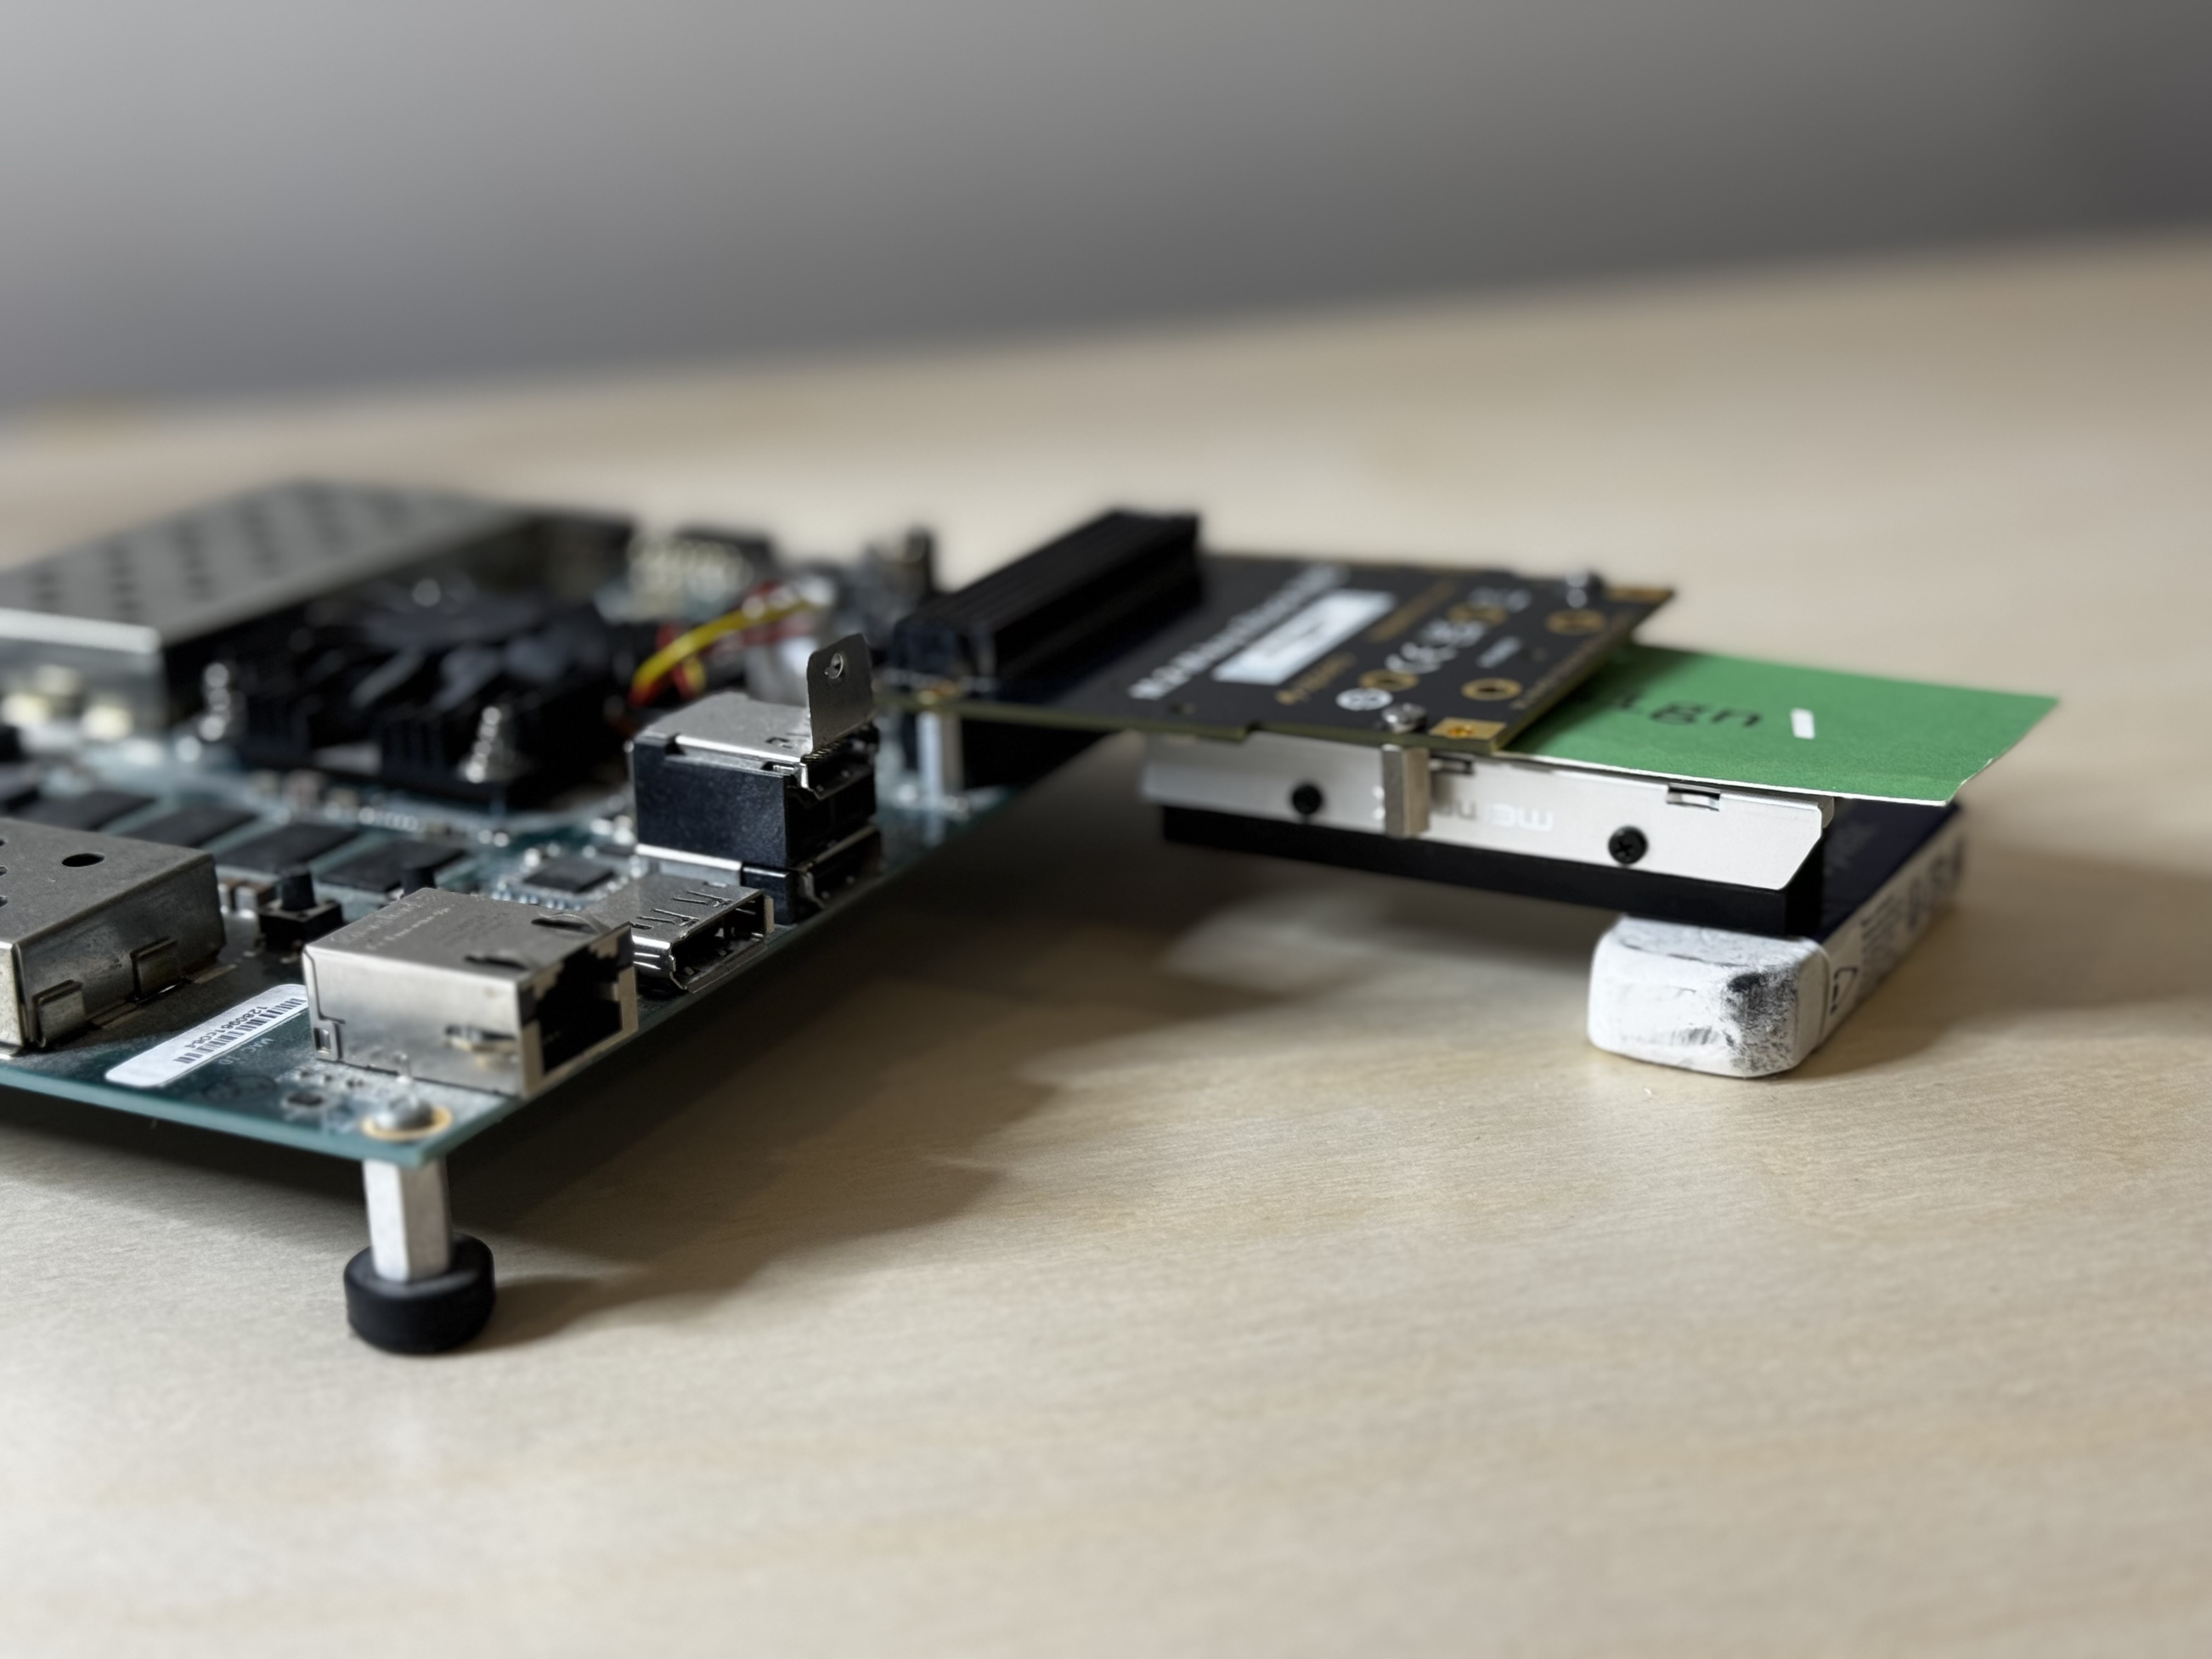
I could make this one step better by acquiring Opsero’s M.2 FMC extension, which would accommodate the 2280 length of the Axelera, DeepX, and MemryX modules:
There are some recommendations I would make for the M.2 Stack FMC, in the context of properly supporting the Axelera Metis, DeepX DX-M1, and MemryX MX3:
- remove components on connector side of PCB (to prevent short-circuits)
- use M.2 M-Key connectors that are higher (to allow for metal casing)
Once again, these recommendations are in order to accommodate M.2 AI accelerators which are “out of spec” from the M.2 M-Key form factor.
Conclusion
For an embedded design targeting AMD PetaLinux 2025.2 (Yocto version 5.0 LTS, scarthgap), the following M.2 AI accelerators compiled cleanly with their public Yocto recipes:
- Hailo-8 —
meta-hailo/hailo8-scarthgap— full integration of driver, runtime, and APIs - Axelera Metis —
meta-axelera/yocto/scarthgap— driver only (runtime and APIs come from Python wheels installed after boot) - DeepX M1 —
meta-deepx-m1/scarthgap— full integration of driver, runtime, and APIs
For the MemryX MX3, I was able to fork the memx-yocto repo, and implement changes in a mb-edgeai-amd-petalinux-2025.2 branch.
Here is a matrix of validations that I was able to produce:
| ZCU104 | UZEV | ZCU106 | |
|---|---|---|---|
| Hailo-8 | ✅ | ✅ | not tested |
| Axelera Metis | ✅ | ✅ | not tested |
| DeepX M1 | ✅ | ✅ | not tested |
| MemryX MX3 | ✅ | not detected | not tested |
NOTE: The MemryX MX3 was successfully tested on ZCU104. On the UltraZed-EV SOM and carrier (UZEV), however, I am still not able to detect it despite the PERST# assertion at boot.
NOTE: I do not have a ZCU106 board, so was not able to validate the M.2 AI accelerators on this carrier.
For the platforms where detection was successful, the following ResNet FPS results were measured:
| ZCU104 (1x) | UZEV (4x) | ZCU106 (4x) | |
|---|---|---|---|
| Hailo-8 | 1371.51 FPS | 1371.45 FPS | |
| Axelera Metis | 500.9 FPS | 528.8 FPS | |
| DeepX M1 | 1045.45 FPS | 1050.91 FPS | |
| MemryX MX3 | 1007.27 FPS |
The first observation that is worth noting is the Hailo-8 performance (FPS) being nearly identical between the ZCU104 with 1x PCIe lane, and UZEV with 4x PCIe lanes. The UZEV consumed slightly more power than the ZCU104 (4.15W versus 4.01W). We will not dwell on power measurements in this article, since the power measurement is not available for all vendors.
The DeepX M1 also has very similar performance between 1x lane and 4x lane PCIe implementations. For a “small” model like ResNet-50, PCIe bandwidth is not the bottleneck.
The Axelera Metis is a slight exception — 4x lanes deliver a modest ~5.6% improvement over 1x lanes (500.9 → 528.8 FPS). The lift is small but measurable, distinguishing Axelera’s data-transfer pattern from the flat-line PCIe behavior of Hailo and DeepX on this workload.
I need to make one disclaimer about the Axelera Metis performance result. I used the axrunmodel that comes with the axelera-rt wheel. In a previous article, Edge AI Power Benchmarking - Part 4: Measuring the Power Efficiency of Axelera Metis, on a modern AMD Strix Halo AI PC, I achieved over 2000 FPS using a different utility, inference.py, with four input streams. That same modern AMD Strix Halo AI PC only achieves ~750 FPS with axrunmodel, so there is more performance to achieve by installing the alternate inference.py.
If there are embedded platforms, Yocto versions, or other AI accelerators you would like to see covered, I invite you to reach out to me at:
Vendor Engagement Disclaimer
The drafts of this article were shared with the M.2 AI accelerator vendors prior to publication.
I need to give a shout-out to Navanee Sundaramoorthy at RapidFlare, whose chat-bot deepx.rapidflare.ai provided me the insight to resolve my DeepX detection issue.
I also want to thank Timothy Wesley at MemryX for his insight and support with this article.
Version History
| Date | Description |
|---|---|
| 2026/06/19 | Initial Draft, working for Hailo-8, Axelera Metis, DeepX M1. |
| 2026/07/03 | Added support for MemryX MX3. |
| 2026/07/11 | Added ResNet-50 benchmarking results for all vendors. |
| 2026/07/22 | Added “Known Issues” section discussing mechanical issue. Added disclaimer about use of axrunmodel versus inference.py for Axelera Metis. |